How to tension a shade sail properly


A shade sail that still sags after installation usually does not need more force. It usually needs better sizing, better anchor alignment, better slope, or a more balanced tensioning process.
If you are trying to learn how to tension a shade sail properly, the goal is not to pull the fabric as flat as possible. The goal is a sail that feels firm, looks smooth, sheds water correctly, and carries load evenly across all corners without puckered seams, binding hardware, or leaning posts.
This guide explains how tight a shade sail should be, what to check before you adjust the hardware, why some shade sails sag even after tensioning, and when it is safer to fix the layout instead of tightening harder.
If you are still planning the setup, start with the TheHues shade sail measurement guide before ordering fabric or hardware. Getting the size and anchor layout right is the easiest way to avoid tension problems later.
Quick answer: how to tension a shade sail properly
Tension a shade sail gradually until the fabric looks smooth, the seams sit cleanly, and the load feels even across all anchor points. Stop before the seams pucker, the turnbuckles bind, or the posts and wall plates begin to move out of line.
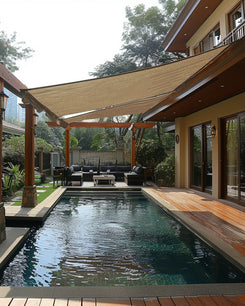
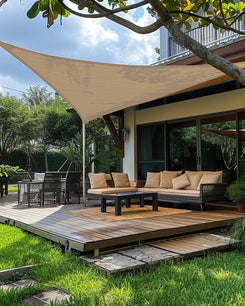
A properly tensioned shade sail should be firm and stable, but it should not look strained. Some center curve is normal, especially on larger sails. A sail is not meant to become a perfectly flat rigid panel.
| What you see | What it may mean | What to do next |
|---|---|---|
| Loose belly in the middle and flapping edges | Under-tension, poor slope, or too much span | Check layout, then tighten evenly |
| Wrinkles near one corner | Uneven loading or off-line pull direction | Back off and retighten gradually |
| Turnbuckles are fully closed but the sail still sags | Sail may be too large or anchors may be too close | Fix sizing or spacing instead of forcing tension |
| Posts lean inward or plates twist | Over-tension or weak support structure | Stop and inspect the anchors immediately |
| Water pools on a waterproof sail | Not enough slope or drainage direction | Adjust height variation before adding more force |
Use this basic sequence:
- Measure anchor to anchor, not just the patio area you want shaded.
- Leave room for hardware and adjustment, because the finished sail should be smaller than the anchor span.
- Attach all corners loosely first before trying to finish one corner.
- Tighten gradually and evenly, moving from corner to corner.
- Stop at firm and smooth, not perfectly flat at all costs.
If you are choosing a new sail, compare the TheHues sun shade sail collection with the measurement guide before buying. That is much safer than guessing the hardware gap after the sail arrives.

Before you tension a shade sail, check size and geometry
Most shade sail tension problems begin before the first turnbuckle moves. If the finished sail is too large, the anchor points are misaligned, or the sail is installed too flat, extra tightening will not create a clean, safe result.
The sail should be smaller than the anchor span
A shade sail should not match the anchor-to-anchor opening exactly. You need space for D-rings, turnbuckles, snap hooks, and final adjustment.
The exact deduction depends on the sail shape, hardware, anchor layout, and product instructions. A triangle sail, rectangle sail, waterproof sail, and breathable sail may all need slightly different planning.
The key idea is simple: order by the finished sail size, not by the empty space alone. If the sail is too close to the raw anchor span, the hardware may run out of adjustment before the fabric can develop proper tension.
Pull direction should follow the sail shape
Shade sail tension should pull outward from each corner in a natural line. If the anchor points sit off the intended pull direction, one side may wrinkle while another side feels too tight.
This is why a shade sail can look worse after someone tightens it. The issue may not be slack. It may be that one corner is pulling against the wrong angle.
Height variation matters as much as tension
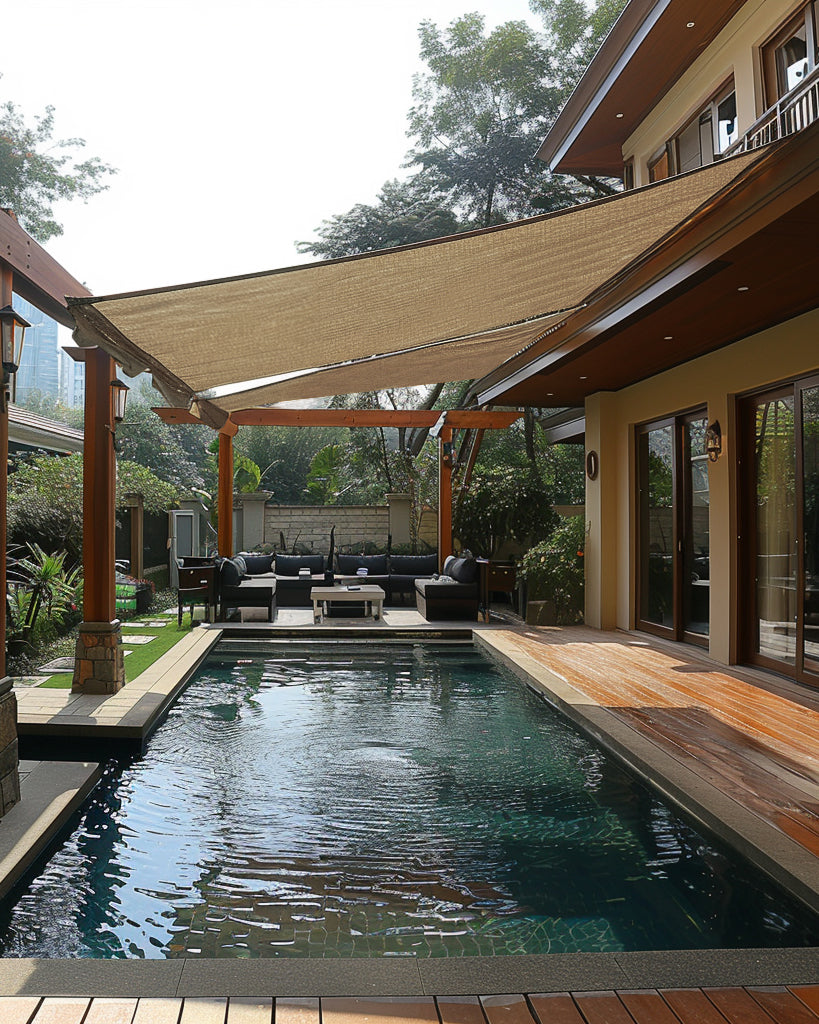
A shade sail installed in one flat plane is harder to tension well and more likely to flap or hold water. Height variation helps the fabric hold shape and gives rain a path to drain.
This matters most with waterproof shade sails. If water cannot leave the surface, it can pool in the middle, stretch the fabric, and add stress to the anchors. Do not rely on brute force to solve a drainage problem.
Structure strength is part of the tension system
A shade sail is only as stable as the posts, walls, or beams behind it. If a post flexes or an anchor plate shifts, the sail may look loose even when the fabric itself is tight.
Before adjusting the hardware, inspect:
- mounting plates and fasteners
- post movement at the base
- cracks in masonry or loose wall anchors
- whether each anchor can handle pull from the correct direction
- whether the structure is suitable for the sail size and exposure
If the support structure moves, stop. Tightening harder will not fix a weak anchor point.

Step by step: how to tension a shade sail
Once the size, slope, and supports look right, the actual tensioning process is straightforward. The important part is to keep the load balanced while you adjust.
1. Open the hardware before attaching the sail
Start with turnbuckles mostly open so you have adjustment range. If you begin with the hardware already half tightened, you may run out of room before the sail is properly tensioned.
Lay out the sail, confirm the corners, and check the fabric orientation. Also confirm whether you are installing a breathable sail or a waterproof sail, because waterproof fabric needs more careful drainage planning.
2. Attach the corners loosely first
Connect the first corners without trying to create final tension. At this stage, the sail should be suspended, aligned, and easy to inspect.
The fabric may still look soft. That is expected. Do not finish one corner before the others are attached and aligned.
3. Use a rope or pulley assist for the final corner
The final corner often needs help because the fabric is beginning to carry tension. A rope or pulley assist can help you guide the corner into place without jerking the sail or overloading a single fitting.
If the final corner connects with no resistance while the sail already looks loose, the finished sail may be too small for the intended coverage or the anchor spacing may need review.
4. Tighten turnbuckles gradually
Move corner by corner in small adjustments. Give one turnbuckle a few turns, then move to another corner and repeat.
Do not tighten one corner all the way while the others remain loose. Uneven tension can create corner wrinkles, distorted seams, and unnecessary stress on the anchor points.
5. Watch the fabric surface
The fabric will tell you more than the hardware position. A good tension point usually shows a smooth surface, clean seams, and a controlled curve.
If the sail starts to pucker, twist, or look strained, stop tightening and review the pull direction and anchor layout.
6. Recheck after the sail settles
After installation, give the sail time to settle. Heat, wind, and fabric tension can slightly change how the surface sits.
Check for:
- a new low point forming in the center
- one corner carrying more visible strain
- hardware rotating out of line
- posts or anchors shifting under load
- water not draining as planned
If the layout is difficult, use the TheHues free design service with a clear photo of your patio, pergola, or deck before continuing to adjust the hardware.

How tight should a shade sail be?
A shade sail should be tight enough to reduce flapping and hold its shape, but not so tight that the structure begins to move or the seams look stressed.
Signs the shade sail is too loose
Your shade sail may be too loose if:
- the edges flutter in ordinary breeze
- the center keeps dropping after warm days
- water collects on waterproof fabric
- the sail slaps the hardware or hums in wind
- the surface looks collapsed instead of intentionally curved
Loose sails can wear faster because repeated movement adds stress at seams, D-rings, and attachment points.
Signs the shade sail is tight enough
A properly tensioned sail usually has:
- a smooth surface from corner to corner
- clean seams without sharp puckering
- light movement in breeze without whipping
- stable posts and anchors
- a controlled center curve rather than a deep sag
Some curve is normal. A shade sail should look firm and settled, not forced into a rigid flat shape.
Signs you are over-tensioning the sail
Over-tensioning can damage the fabric, hardware, or structure. Watch for:
- corner seams puckering
- mounting plates twisting
- posts leaning inward
- hardware that becomes difficult to adjust
- fabric that looks strained instead of smooth
If tightening harder makes the structure look worse, the problem is not tension. It is likely sizing, anchor position, or support strength.
Why a shade sail still sags after tensioning
If the sail still sags after careful adjustment, the cause is usually upstream. Tightening more may hide the issue briefly, but it will not fix the layout.
The anchor points are too close
If the turnbuckles are almost fully closed and the sail still has a deep belly, there may not be enough space between the finished sail and the anchors. The hardware needs room to create and maintain tension.
The sail is installed too flat
A flat layout can look clean in a drawing but fail outdoors. Waterproof sails especially need a clear slope so rainwater can move off the fabric.
If water is pooling, add height variation or adjust the drainage direction before applying more tension.
The pull line is wrong
If a corner pulls from the wrong angle, the sail may wrinkle in one area and sag in another. This often happens when the anchor point is placed where it was convenient rather than where the sail geometry needed it.
The support structure is moving
A shifting post or loose anchor can make a newly tensioned sail look loose again. Check the structure before blaming fabric stretch.
For questions about posts, anchors, and larger layouts, review the TheHues shade sail installation guide before making major changes.
Breathable vs. waterproof shade sails need different tension planning
Not all shade sails behave the same way. Fabric type changes how much slope, drainage, and maintenance you need to plan for.
Breathable sails are usually more forgiving
Breathable shade sails allow air and some water to pass through the fabric. They are often easier to use in hot, sunny spaces where airflow matters more than rain coverage.
They still need proper tension, but they are usually more forgiving than waterproof sails when the main goal is cooling and UV relief.
Waterproof sails need stronger drainage planning
Waterproof shade sails can add rain protection, but they need more careful slope and tension. If the surface is too flat, water can collect and add load quickly.
Think of a waterproof sail as both shade and drainage. The fabric should not only cover the area; it should also send water where it can safely run off.

Triangle and rectangle sails behave differently
A triangle sail often feels easier to tension because it has fewer corners and clearer pull lines. A rectangular shade sail covers more area, but it gives you more chances for one corner to sit out of plane or one diagonal to carry more load than the other.
For larger spaces, two smaller sails may work better than one oversized rectangle. The result can be easier to tension, easier to maintain, and often more visually intentional.
If your real goal is side privacy rather than overhead shade, compare outdoor curtains before defaulting to a shade sail. The best outdoor setup comes from matching the product to the problem.

How to keep a tensioned shade sail looking right
Good installation is the start. Long-term performance depends on small maintenance habits, especially after wind, rain, and heat cycles.
Recheck hardware after weather changes
Inspect turnbuckles, snap hooks, D-rings, and mounting plates after the first week and then periodically through the season. Hardware can loosen slightly as the sail settles.
Keep debris off the sail
Leaves, dirt, and trapped moisture add weight and can affect drainage. Clean the sail before buildup becomes heavy, especially along seams and low points.
Secure or remove the sail during severe weather
A shade sail is designed for outdoor tension, but it should not be treated as storm-proof. The National Weather Service advises securing outdoor items before high winds, and fabric shade structures should be handled with the same caution.
If strong wind or severe storms are forecast, detach a corner or remove the sail according to the product instructions. It is better to protect the fabric and hardware than to test the limits of the installation.
FAQ
How much smaller should a shade sail be than the space?
A shade sail should be smaller than the anchor-to-anchor space so there is room for hardware, adjustment, and final tension. The exact deduction depends on the sail shape, hardware, and product instructions, so use the measurement guide before ordering.
Can you overtighten a shade sail?
Yes. If seams pucker, anchors twist, turnbuckles bind, or posts begin leaning, the sail may be overtightened. A shade sail should be firm and smooth, not forced flat.
Why does my shade sail sag in the middle?
Some center curve is normal. Deeper sag usually comes from too little hardware gap, poor anchor alignment, weak supports, not enough slope, or a finished sail that is too large for the anchor layout.
Do all corners need turnbuckles?
Not always. Many setups use turnbuckles on key corners and compatible connectors on the others. What matters is having enough adjustment to tension the sail evenly.
Is a waterproof shade sail harder to tension than a breathable one?
Usually, yes. Waterproof fabric needs more careful slope and drainage planning because rainwater cannot pass through the fabric. Breathable sails still need tension, but they are generally more forgiving for hot, dry shade applications.
Should a shade sail be completely flat?
No. A shade sail should be smooth and firm, but a slight curve is normal. A completely flat install can create drainage problems, especially with waterproof fabric.
Final takeaway: tension should be balanced, not forced
The best shade sail tension comes from the right finished size, the right pull direction, enough height variation, and patient corner-by-corner adjustment.
If your sail still sags, do not keep tightening until something moves. Recheck the anchor spacing, slope, pull direction, and support structure. Most tension problems are layout problems first.
When you are ready to plan or correct a setup, compare the sun shade sail collection, confirm the numbers in the shade sail measurement guide, and use the TheHues Help Center if you need support before ordering.