Deal Ends In 22 Days


 Loyalty Plan
My Cart ()
×
Subtotal: $0.00
VIEW CART
MOST SEARCHED PRODUCT

RECENTLY SEARCHED
Related Product
GUESS YOU WANT TO SEARCH
CATEGORY
SUGGEST PRODUCTS
1. Curtains Guide
Curtains Guide
How to choose curtains?
Light Filtration Calculator
How to Customize
How to Install
Curtain Weight Calculator
Door Curtains Guide
How to Choose
How to Measure
Outdoor Products
How to Measure Shade Sails
How to Install Shade Sails
Curtain Accessories
Curtain Rods and Tracks
How to Measure & Install Curtain Accessories
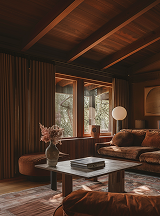
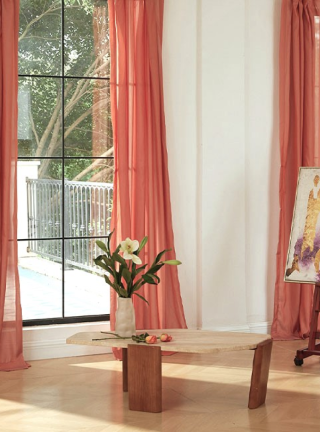
Choosing the right curtains can significantly transform a space, bringing a softer, more comfortable ambiance to your living environment.
Featuring unique textures and a sense of design, our curtains range from adding elegance and comfort to transforming spaces with creative effects. Each curtain meets diverse needs and tastes, adding comfort, warmth, and personality to your space.
Foil-printed velvet curtains combine the opulence of velvet with the sophistication of hot-stamped foil designs. This process imprints unique, eye-catching prints onto the luxurious velvet fabric, creating a striking interplay of texture and shine. The result is a collection of curtains that offer both rich tactile depth and a visually stunning, metallic finish.
Sheer curtains, made from transparent and lightweight materials, serve as excellent light filters. Their flowing beauty and functional benefits enhance the atmosphere of any room while offering a stylish complement to various settings.
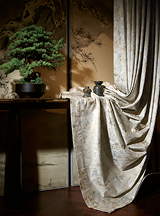
The intricate weaves and patterns offer a tactile quality that enhances both visual appeal and overall ambiance. Ideal for adding a touch of grandeur and sophistication, these textured curtains elevate the decor with their elegant and luxurious finish.
Custom solid-colored curtains, available in an extensive palette of hues, offer the perfect foundation to enhance your decor with a timeless, minimalist charm. Whether you aim for a bold statement or a subtle accent, these curtains are precisely tailored to your dimensions for a flawless fit. Their durable construction and versatile styling make them a seamless addition to any space, adding warmth, texture, and elegance. Perfect for bedrooms, living rooms, or offices, these curtains effortl essly blend style and functionality, offering a personalized touch to your interiors.
Transform your home with our custom linen curtains, where rich texture meets rustic elegance. The natural weave of linen infuses timeless charm, bringing warmth and sophistication to any room. These durable, stylish curtains seamlessly combine form and function, enhancing your space with their organic beauty. Discover the perfect linen curtains to complement your decor and elevate your home's ambiance effortlessly.
Immerse yourself in the luxurious allure of our custom velvet curtains, where richness and elegance harmoniously unite. The sumptuous texture of velvet brings a refined sophistication to any space, fostering a warm and inviting ambiance. These curtains not only elevate your decor with their opulent appearance but also offer superior light control and insulation. Explore our collection to discover the perfect velvet curtains that seamlessly combine style and practicality, enhancing your home's atmosphere with effortless elegance.
Featuring unique textures and a sense of design, our curtains range from adding elegance and comfort to transforming spaces with creative effects. Each curtain meets diverse needs and tastes, adding comfort, warmth, and personality to your space.
Transform your home with our custom cotton blend curtains, where comfort and versatility come together. The soft, breathable texture of cotton creates a light, airy atmosphere, making any room feel more inviting. Renowned for their durability and ease of care, these curtains are ideal for various settings. The cotton blend delivers a natural, laid-back aesthetic, infusing your decor with a subtle elegance. Discover the timeless beauty and exceptional quality of our cotton blend curtains, expertly crafted to enhance and elevate any living space.
Discover our collection of custom curtains made from synthetic fibers, celebrated for their durability and low-maintenance qualities. Designed to withstand the rigors of everyday use, these curtains are an ideal choice for any room in your home. The synthetic fabric is easy to clean and resistant to fading, ensuring your curtains maintain their vibrant look for years. Available in a wide range of styles and colors, our synthetic curtains blend practicality with aesthetic appeal, offering a hassle-free solution without compromising on quality or design.
4 - Layer Soundproof Fabric
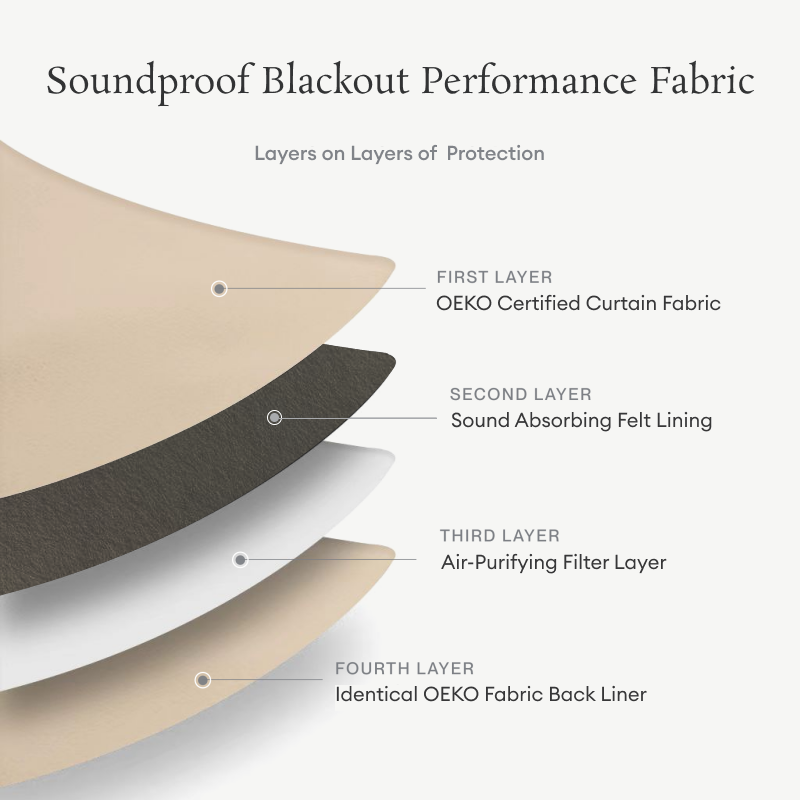
Depending on the fabric and lining, these curtains can block 15-20 dB of sound.
Our fire-retardant curtains are available in two options: the single-layer Flame Curtain and the 4-Layer Soundproof Flame Curtain. Both the single-layer and 4-layer fire-retardant curtains feature top fabrics that have been NFPA701 certified (certificate link). You can choose based on functional needs and compliance with fire safety regulations.
Curtains have the ability to regulate light, with different types catering to various lighting needs. Sheer and light-filtering styles allow sunlight to pass through and can be layered to enhance a cozy atmosphere, while blackout curtains add privacy and a touch of style, creating a more secluded and serene space.
Allows maximum light to pass through while still providing minimal privacy.
Light filtering curtains evenly diffuse light throughout the room, creating a soft, warm glow.
Fabrics like Quinn, Victoria, Florence, and Kensington effectively block out light when unlined, achieving 100% darkness in your space. This creates a more comfortable sleep environment, helping you rest better. Explore our extensive selection of blackout curtains for more options.
Each blackout soundproof curtain is equipped with a built-in soundproof layer that effectively reduces external noise, creating a serene environment for relaxation or concentration. Choose from our wide array of colors and fabrics to find the perfect combination of functionality and style for your home.
Note: Unlined fabrics itself can achieve varying levels of light control
For a tactile experience of texture and color, we offer fabric swatches for you to choose from.
Curtain Fabric
Liner Fabric
*Click "+" button to add fabric
Cutain Fabric: {Fabric} Total of {shading}% light blocked with the selected curtain Light filtration level: {liner}
Choose Your Curtain Fabric
Single Layer Curtains
4 Layer Curtains
Choose Your Liner Fabric
Unlined
Privacy
Soft Flat Finish Lining
Thick Satin Finish Lining
100% Blackout
Same fabric liner
Unlined
Privacy
Soft Flat Finish Lining
Thick Satin Finish Lining
100% Blackout
Same fabric liner
Greyish White Liner
Black Liner
Comparable Color Liner
Same fabric liner

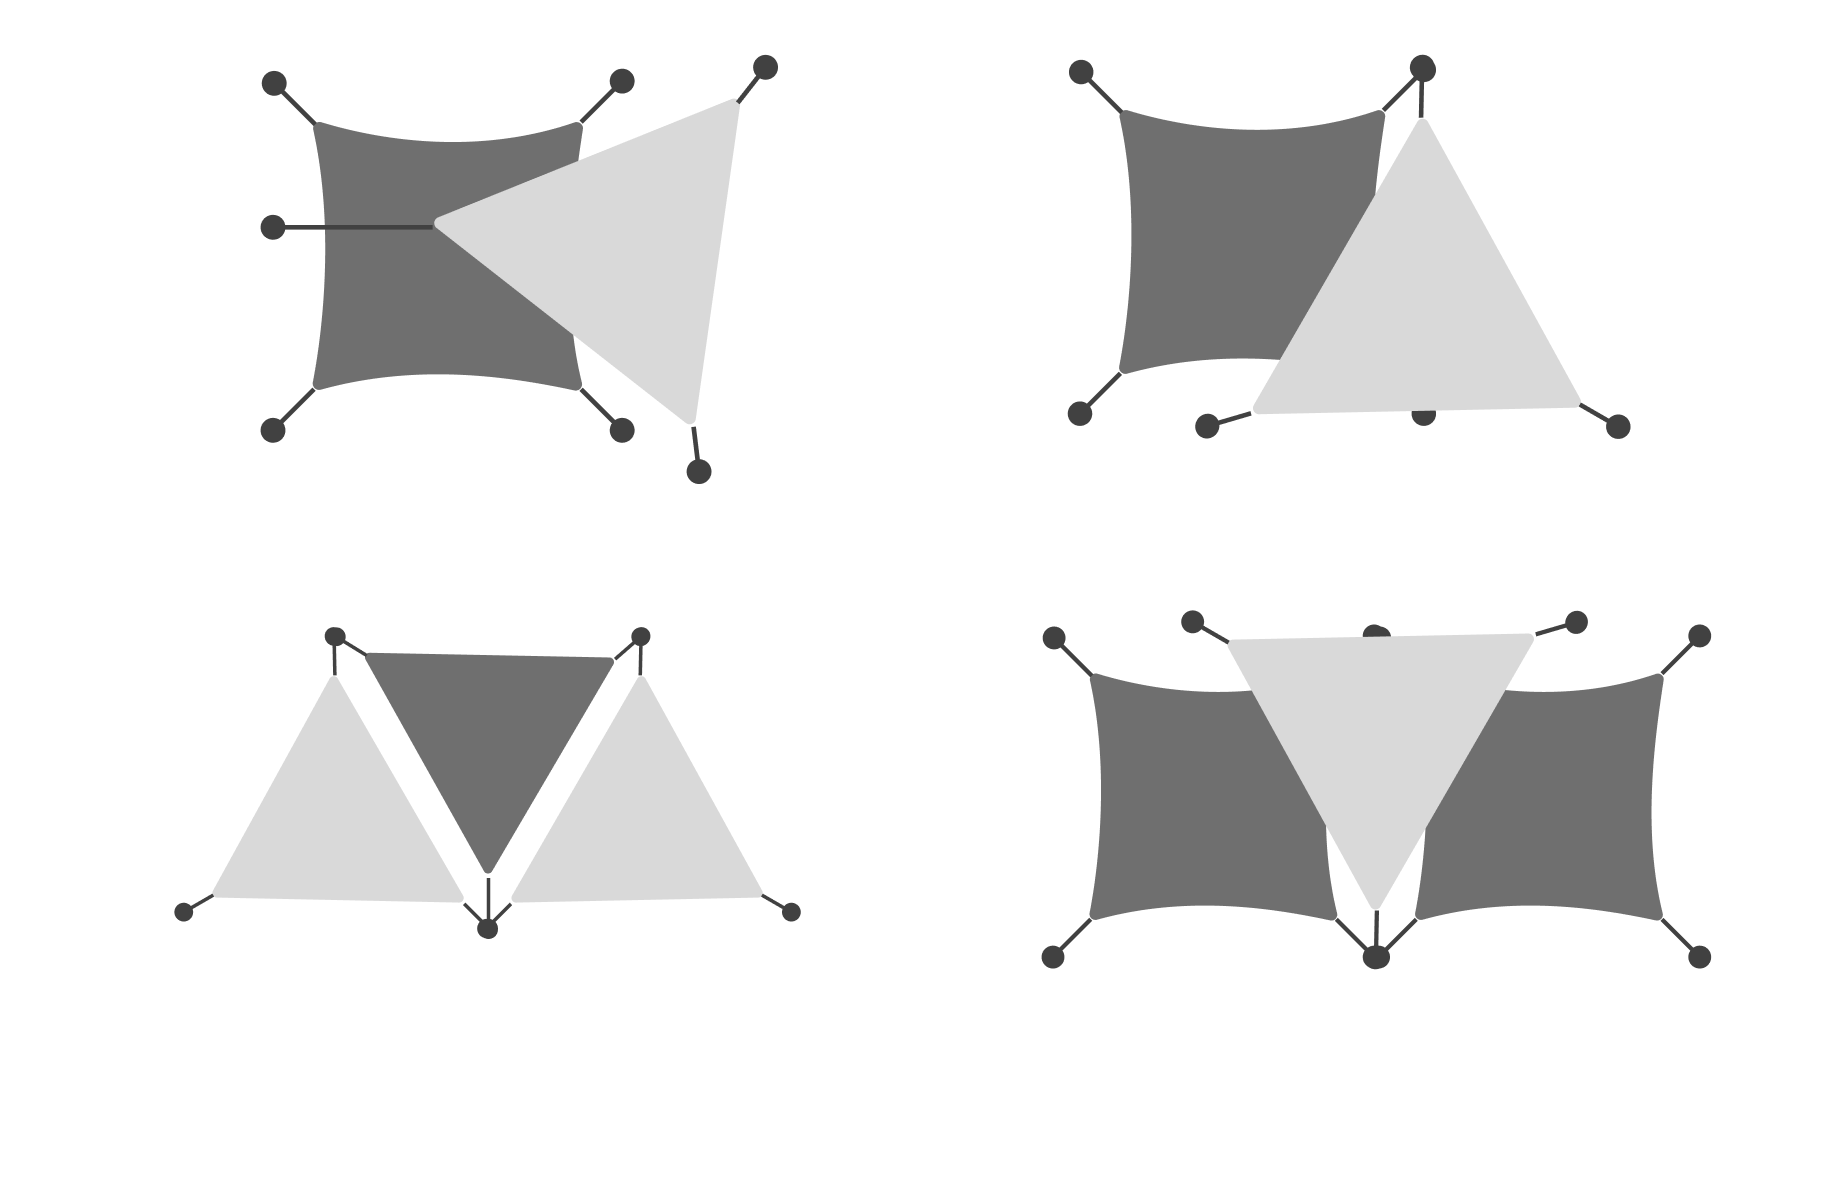
Through picking the header, lining and size. Achieve your perfect curtain look.
Back Tab
The fabric loops (or tabs) are sewn onto the back of the curtain. These tabs slide directly onto the curtain rod, creating a clean, tailored look. The sleek back-tab design conceals the curtain rod and maximizes curtain height. It is suitable for curtain rods.
A recommended fullness ratio of 2.0x is suggested. If your track or rod length is 100 inches, you can order a 200-inch curtain or two 100-inch curtains.
No curtain accessories (clips / rings) are included or needed for this header.
Grommet
Featuring large metal grommets embedded directly into the fabric along the top edge. These grommets allow the curtain to slide smoothly onto a rod, creating evenly spaced, deep folds or pleats when hung.
A recommended fullness ratio of 2.0x is suggested. If your track or rod length is 100 inches, you can order a 200-inch curtain or two 100-inch curtains.
No curtain accessories (clips / rings) are included or needed for this header.
Rod Pocket
A classic curtain header where the fabric is sewn into a pocket at the top of the curtain, allowing a curtain rod to be inserted directly through the pocket. This simple design creates soft, subtle pleats and provides a clean, traditional look.
A recommended fullness ratio of 2.0x is suggested. If your track or rod length is 100 inches, you can order a 200-inch curtain or two 100-inch curtains.
No curtain accessories (clips / rings) are included or needed for this header.
Tab Top
Fabric loops, or "tabs," are sewn above the top edge of the curtain. These tabs are designed to hang over the curtain rod, with each tab creating a visible loop along the top of the curtain.
A recommended fullness ratio of 2.0x is suggested. If your track or rod length is 100 inches, you can order a 200-inch curtain or two 100-inch curtains.
No curtain accessories (clips / rings) are included or needed for this header.
Pinch Pleat – Double / Triple
The fabric is gathered and stitched at regular intervals to create a series of pleats that are "pinched" together at the top. This creates a tailored, formal look with deep, uniform folds that allow the curtain to hang beautifully.
The width you enter is the width of the top of the curtain after pleating. It is the width you wish to cover, the default fullness ratio is 1.8x (how tight the pleats are together).
Suitable for tracks, rods, slot rods, and rods with rings.
The height measurement is from the eyelet ring to the floor.
Accessories include adjustable height lift hooks and a set of optional S-hooks; curtain rod and rings are not included.
Goblet
The pleats are pinched at the bottom to form a goblet-like style.
The width you enter is the width of the curtain header, with a default fullness ratio of 2x.
Suitable for tracks, rods, slot rods, and rods with rings.
The measurement range is from the eyelet ring to the floor.
Accessories include adjustable height lift hooks and a set of optional S-hooks; curtain rod and rings are not included.
Inverted Box
Flat seams are used to minimize bulk, giving a more understated look compared to other pleat styles.
The width you enter is the width of the curtain header, with a default fullness ratio of 1.5x.
Suitable for tracks, rods, slot rods, and rods with rings.
The measurement range is from the eyelet ring to the floor.
Accessories include adjustable height lift hooks and a set of optional S-hooks; curtain rod and rings are not included.
Designed to provide unparalleled versatility for your curtains, this system includes three types of hooks and clips that are compatible with a variety of curtain tracks and rods. A favorite among architects and interior designers.
4-in-1 design with multiple hanging options: Pin Hooks, Clip Hooks, Pleated Hooks, and Rod Pocket.
Recommended fullness ratio of 2.0: If your track or rod length is 100 inches, you can order a 200-inch curtain or two 100-inch curtains.
Includes adjustable hooks, metal pin hooks, and clip ring accessories.
For more information on fullness ratio, click here.
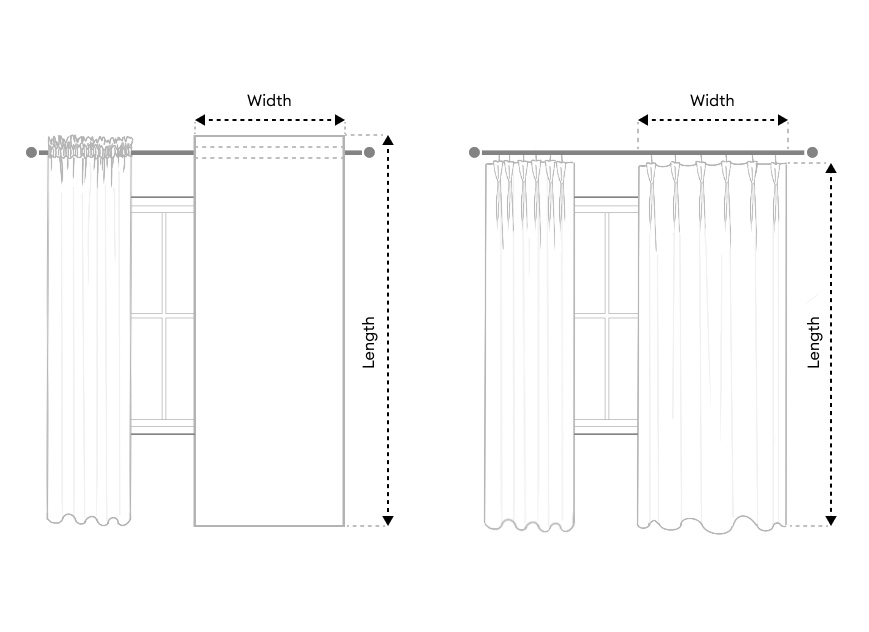
Panel width: the length of the top side of each curtain
Rod Installed
If your rod is already in place, we recommend placing the rod as close to the ceiling as possible for a more spacious appearance.
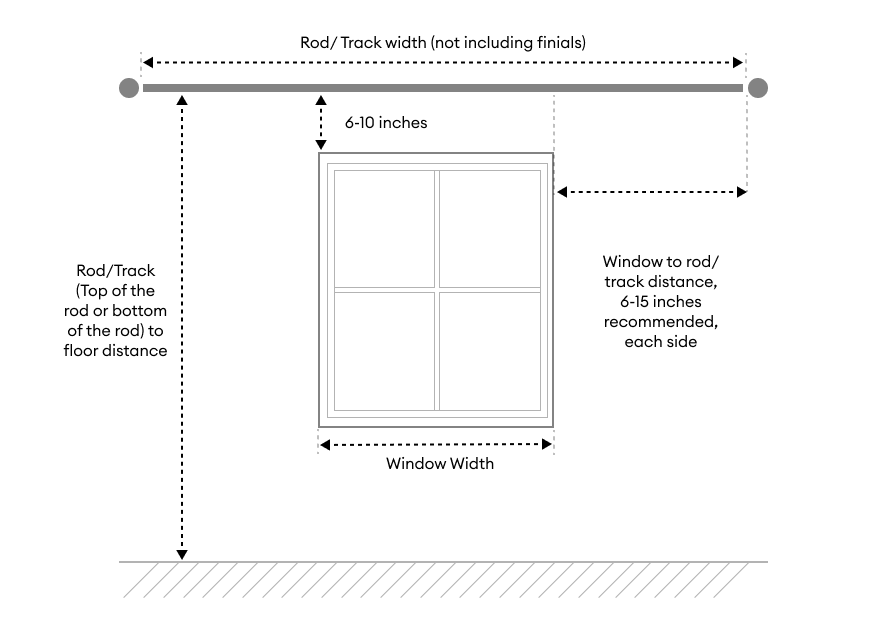
No Rod Installed
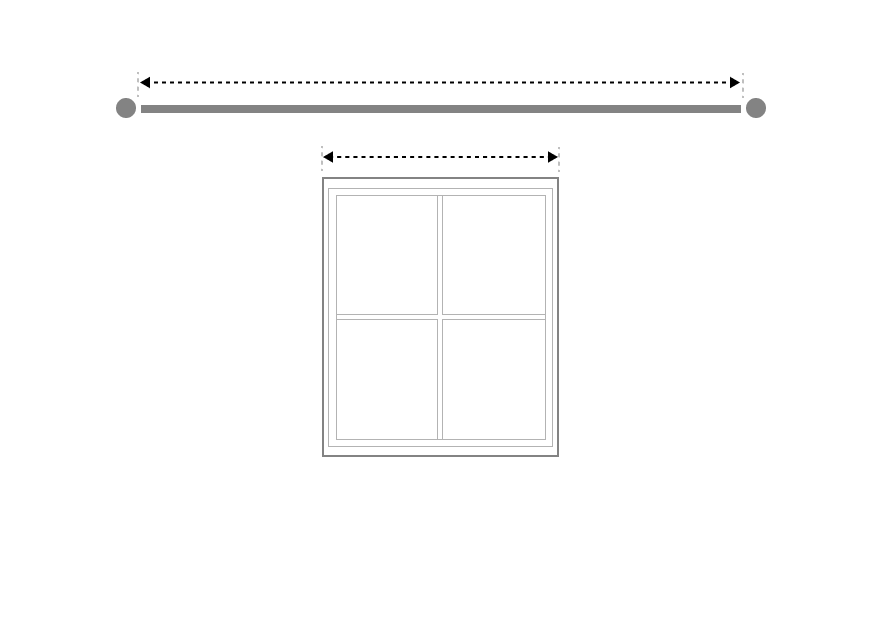
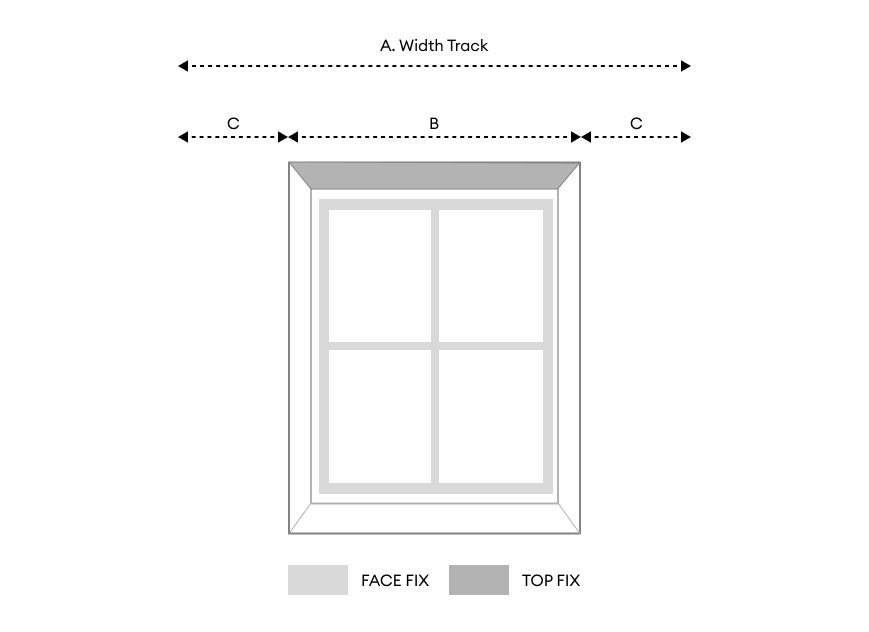
If you have not yet installed the rod or track, add an extra 6-15 inches on each side of the window width to determine the approximate rod/track width.
How to calculate panel width
Actual curtain panel width= rod width x fullness ratio / number of panels
If your track or curtain rod total length is 100 inches:
For Flat Top hanging method, your curtain width should be (Rod width 100 inches x fullness ratio 200%) / number of panels. 1 Panel = 200 inches/panel. — For the grommet hanging method, customers need to input the desired fullness ratio to calculate the width.
For Pleated Top hanging method, your curtain width should be Rod width 100 inches / number of panels. 1 Panel = 100 inches/panel. — The pleated hanging method has a fixed default pleat ratio, so no additional ratio needs to be added in the formula.
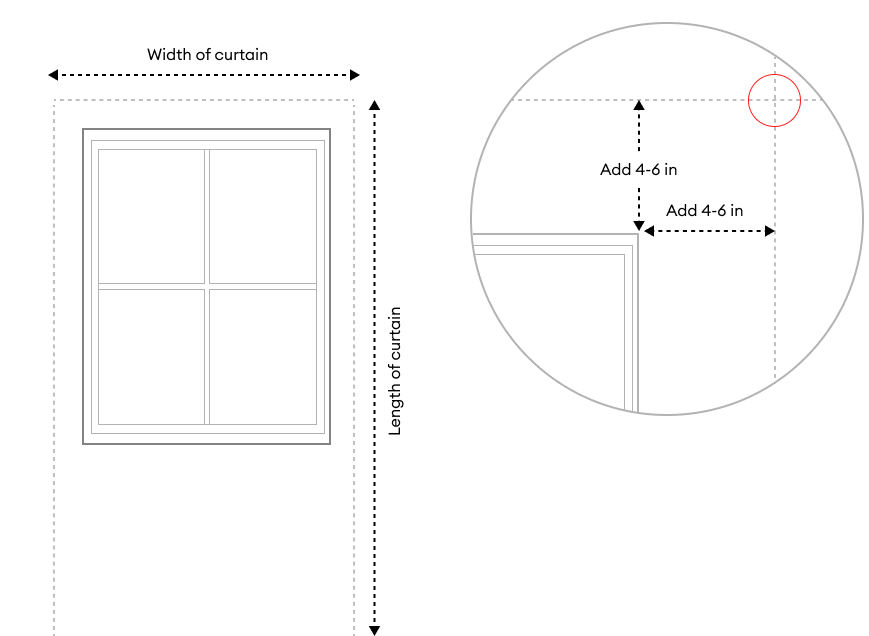
Panel height:
How to measure height
Curtain height measurement positions for different hanging methods
Flat Top (Grommet, Rod Pocket, Back Tab, Tab Top, and Flat Panel)
The height should be measured from the top of the curtain rod to the bottom.
The length of each curtain: Top above the rod + length from the top of the rod to the floor + bottom (add extra length as desired for the curtain's bottom effect).
Different height
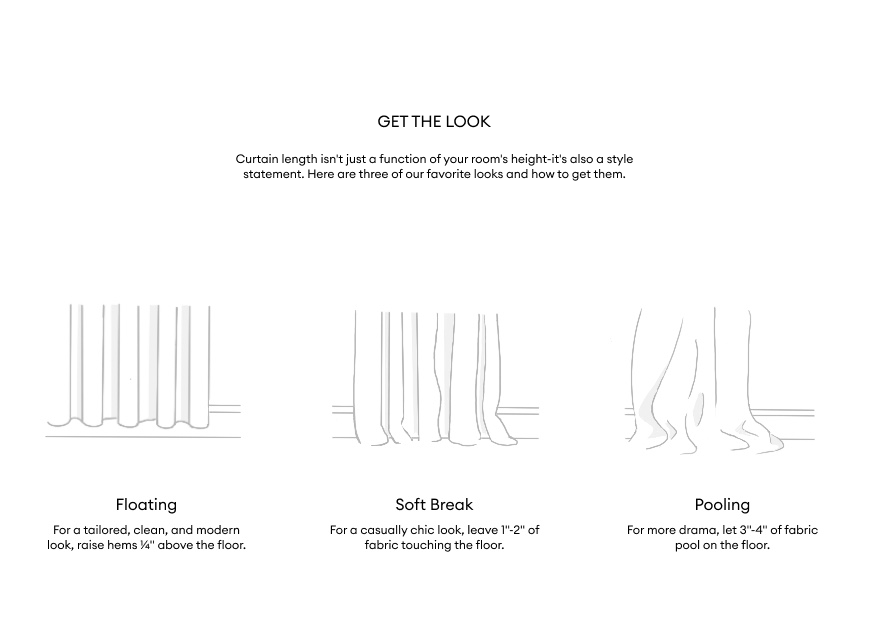
Float
The float style prevents the fabric from dragging on the floor, maintaining a clean, light, effortless look.
Measure the height from the curtain rod to the floor and subtract 1-2 inches for a floating look.
Kiss
The finish gives a sleek and well-thought-out finish to the entire space. Where the curtain length is where it just touches the floor slightly
Measure from the rod till the floor a kiss look. Take your curtain rings into consideration depending on the header
Puddle
Puddled curtains create lush piles of fabric for a luxurious look
Add 2-6 inches depending on your preference to the kiss length.
Lining Fabric: Refers to the material applied to the back of the curtain.
Purpose: The lining enhances the functionality of the curtains, adding a refined drape. It also allows for better control over light filtration, blocks sunlight, reduces noise, and provides insulation, helping to retain heat in winter or keep the space cooler in summer. In addition, it boosts the overall performance and energy efficiency of the curtains.
Privacy Liner : Liner itself blocks 30-50% of light
Soft Flat Finish Liner : Liner itself blocks 60-80% of light
Thick Satin Finish Liner : Liner itself blocks 80-90% of light
Blackout : Provides 100% blackout - no light coming through
Soft Low Density Liner : Liner itself blocks 60-80% light
What is memory training?
Through careful steaming, pressing, and shaping, memory treatment helps the fabric hold its form, enhancing the overall aesthetic of the room while ensuring a consistent polished look over time.
Why choose it?
This is crucial because it helps the fabric retain a uniform and structured appearance, ensuring that pleats or folds stay perfectly in place. By organizing the drape, you can achieve a more refined, graceful look with minimal effort over time.
Grommet
Rod Insertion: Slide the curtain rod through the rings of the curtain panel.
Spacing: Adjust the spacing of the rod's protruding sections to create evenly spaced folds.
Securing the Rod: After evenly distributing the curtains, secure the rod onto the wall brackets.
Tip: Use smooth metal rods rather than wooden ones for a sleek and polished finish.
Rod Pocket
Rod Insertion: Insert the curtain rod through the pocket at the top of the curtain panel.
Spacing: Adjust the spacing between the protruding sections on the rod to create evenly spaced pleats.
Securing the Rod: After evenly distributing the curtains, secure the rod onto the wall brackets.
Tip: Use smooth metal rods instead of wooden ones for a more polished look.
Back Tab
Rod Insertion: Insert the curtain rod through the tabs along the back at the top of the curtains.
Spacing: Adjust the spacing between the protruding sections on the rod to create evenly spaced pleats.
Securing the Rod: After evenly distributing the curtains, secure the rod onto the wall brackets.
Tip: Use smooth metal rods instead of wooden ones for a more polished look.
4-in-1
Clip Rings
Start from one end, attach the clips evenly along the top of the curtain panel to ensure a secure attachment.
S - Shaped Hooks
Insert the sharp end along the top of the curtain panel, ensure they are evenly spread out and leveled.
Pleated Hooks
Start from one end, use the hook to create evenly spread out pleats.
Back Tab
Same as above
Installing Accessories
The installation process for curtains varies depending on the hanging method and accessories used. Below are the installation steps for common accessories such as four-pronged hooks, S-hooks, lift hooks, and clip rings. You can choose the appropriate installation method based on the specific accessories.
Pleated Hooks:
Four-pronged hooks are typically used with traditional curtain rods to ensure a neat pleating effect.
Prepare the Four-Pronged Hooks: Insert the four-pronged hooks into the fabric tape rings at the top of the curtain. Each hook uses its four prongs to secure the top of the fabric. Typically, 10 to 12 hooks are needed per meter of curtain.
Hang the Curtain: Hang the four-pronged hooks on the curtain rod, ensuring each hook is securely attached. Adjust the pleating by pulling the curtain to your desired position.
Adjust Pleats: Once installed, adjust the pleats as needed by repositioning the hooks or adjusting the fabric for the ideal pleating effect.
S-Hooks:
S-hooks are another common hanging method, especially suited for light to medium-weight curtains, providing good pleating results.
Prepare the Curtain Tape: The top of the curtain tape should have eyelets or loops to accommodate S-hooks. If not, you may need to punch holes or sew loops at the top.
Install the S-Hooks: Hang the S-hooks on the curtain rod, ensuring each hook is securely in place. Typically, 12 to 15 S-hooks are needed per meter of curtain, depending on the curtain size.
Hang the Curtain: Attach the curtain tape to the S-hooks, making sure the hooks are firmly in place.
Adjust Pleats: Adjust the pleating by altering the distance between the S-hooks or pulling the curtain to control the density and neatness of the pleats.
Clip Rings:
Clip rings are ideal for situations where curtains need to be easily removed or don't require heavy securing.
Prepare the Clip Rings: Attach the clip rings to the top of the curtain's fabric tape. The rings, usually made of metal or plastic, secure the fabric tape, allowing the curtain to hang effortlessly.
Hang the Curtain: Hang the clip rings on the curtain rod, ensuring that each ring is securely in place.
Adjust Pleats: Since clip rings are not as tight as other hooks, the pleating effect may not be as precise as with four-pronged or S-hooks. Adjust the spacing between the clip rings or pull the fabric to fine-tune the pleats.
Adjustable Hooks:
Adjustable hooks are used with track systems and are ideal for heavier curtains or those requiring automated operation.
Install the Adjustable Hooks: Attach the hooks to the fabric tape. These hooks are typically sliding hooks, allowing you to adjust the height of the curtain as needed.
Hang the Curtain: Place the installed lift hooks onto the track system, ensuring the hooks move smoothly for easy curtain operation. Make sure the hooks slide freely to allow smooth raising and lowering of the curtain.
Other Information
Fullness Ratio
Flat Top (Grommet, Rod Pocket, Back Tab, Tab Top, and Flat Panel)
Default fullness is 1x or 100%, so consider a fullness of 1.5x to 2x for the final measurement width.
1.5x fullness gives a more tailored appearance.
2x fullness creates a richer, more luxurious look.
Rod width should be 1.5 times the curtain width for moderate gathering. The standard gathering rod width is 2 times the curtain width.
The fullness ratio can be determined based on the hanging style.
Fullness ratios vary depending on the hanging style.
Per panel width: Rod or track width x fullness / number of panels.
Pleated Top (Pinch Pleat – Double/Triple, Goblet, Inverted Box Pleat)
The default fullness is designed with 2x fabric fullness. Using 2x fullness achieves the intended pleated effect for a fuller, more structured appearance.
Per panel width: Rod or track width / number of panels.
Curtain Fabric
Liner Fabric
*Click "+" button to add fabric
Choose Your Curtain Fabric
Single Layer Curtains
4 Layer Curtains
Choose Your Liner Fabric
Unlined
Privacy
Soft Flat Finish Lining
Thick Satin Finish Lining
100% Blackout
Same fabric liner
Unlined
Privacy
Soft Flat Finish Lining
Thick Satin Finish Lining
100% Blackout
Same fabric liner
Greyish White Liner
Black Liner
Comparable Color Liner
Same fabric liner
Our insulating door curtains are made to enhance your home's comfort and efficiency. Experience better temperature control, reduced drafts, and lower energy costs with high-quality, thermal insulating materials. These curtains offer effective coverage and stylish designs, ensuring you stay cozy in winter and cool in summer. Elevate your home's ambiance and functionality with our versatile insulating door curtains
Please carefully measure your door dimensions (excluding the door frame) before selecting the appropriate curtain size.
The exact curtain size should be 2 inches wider and 2 inches taller than your door to ensure a proper fit within the door frame.

High-performance UV fabric
Tested to block up to 95% of UV rays, ensuring a relaxed outdoor experience.
UV coating prevents fabric degradation, extending the lifespan of the sunshade sail.
Fade-resistant fabric can withstand over 1000 hours of harsh outdoor conditions.
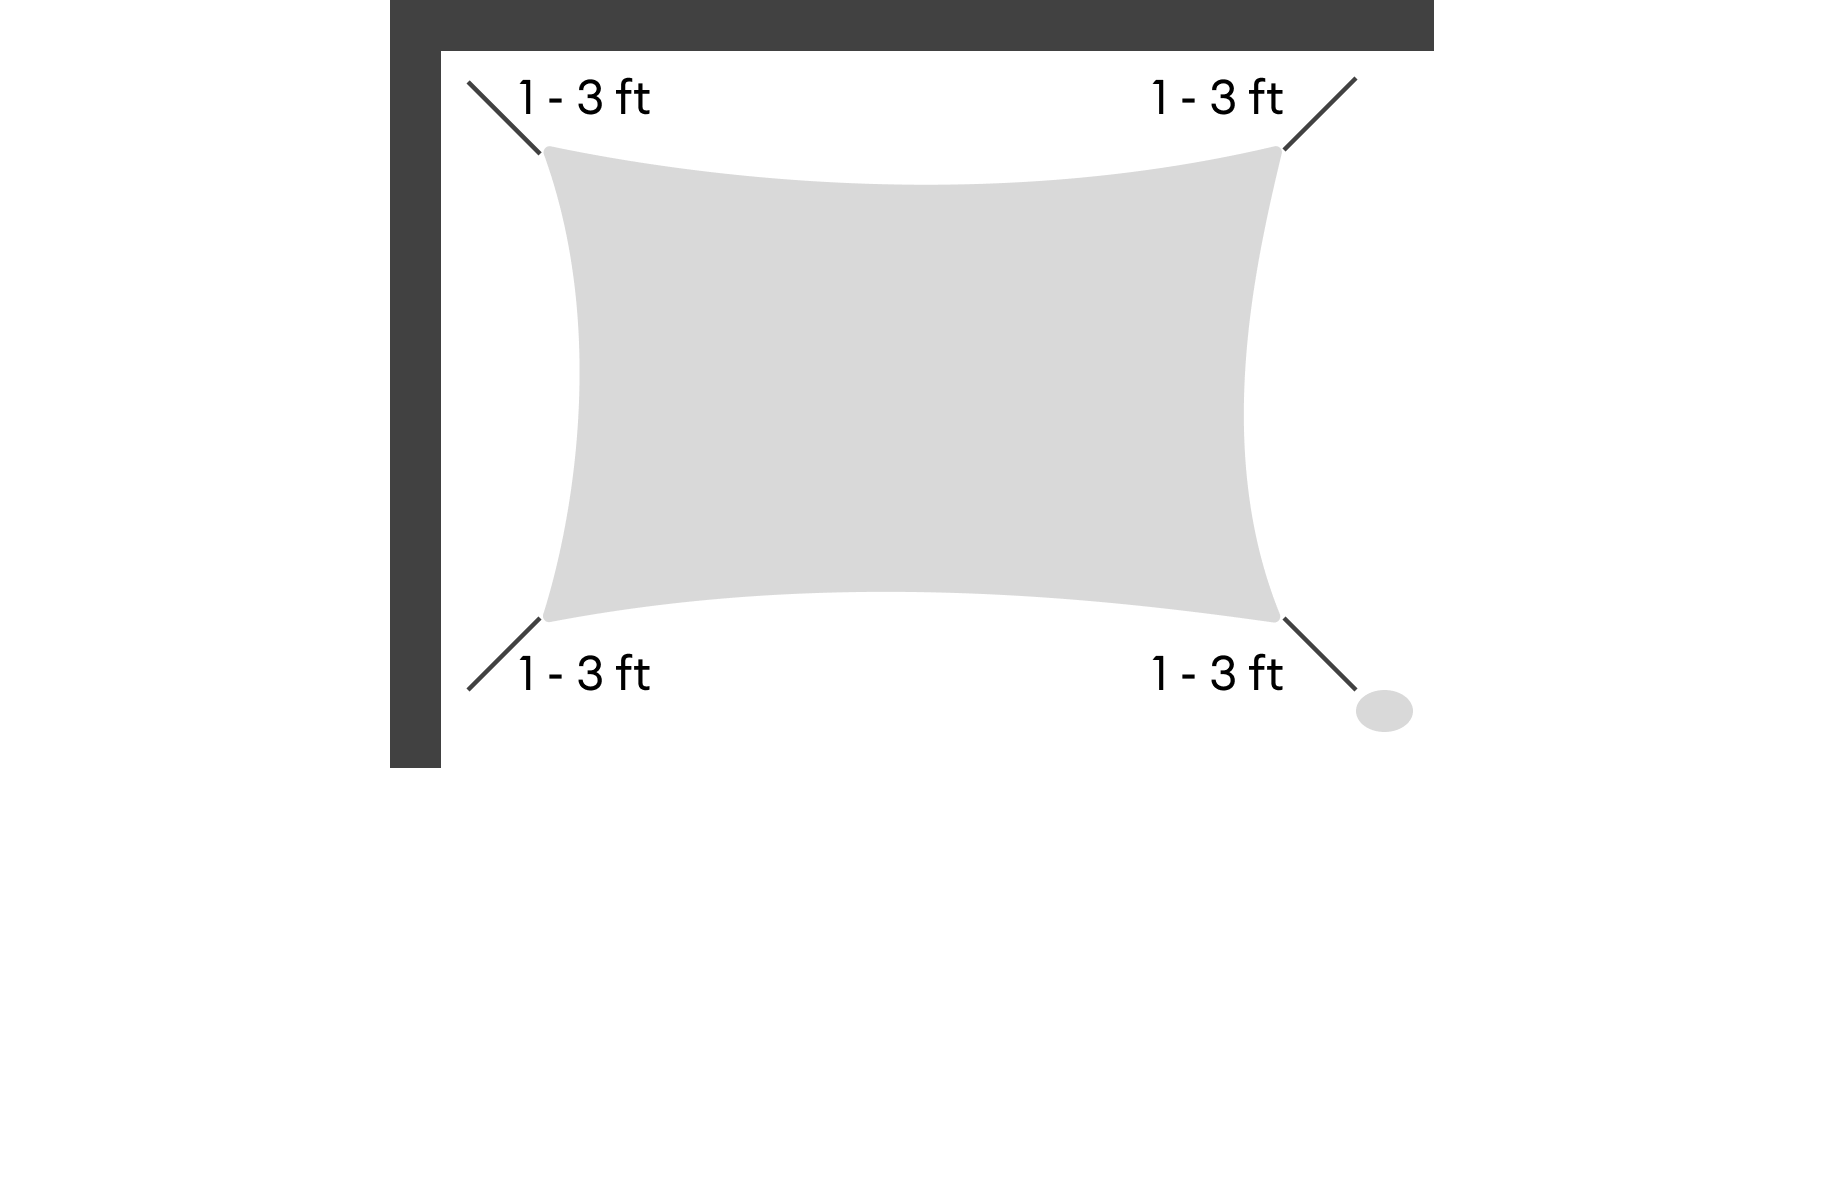
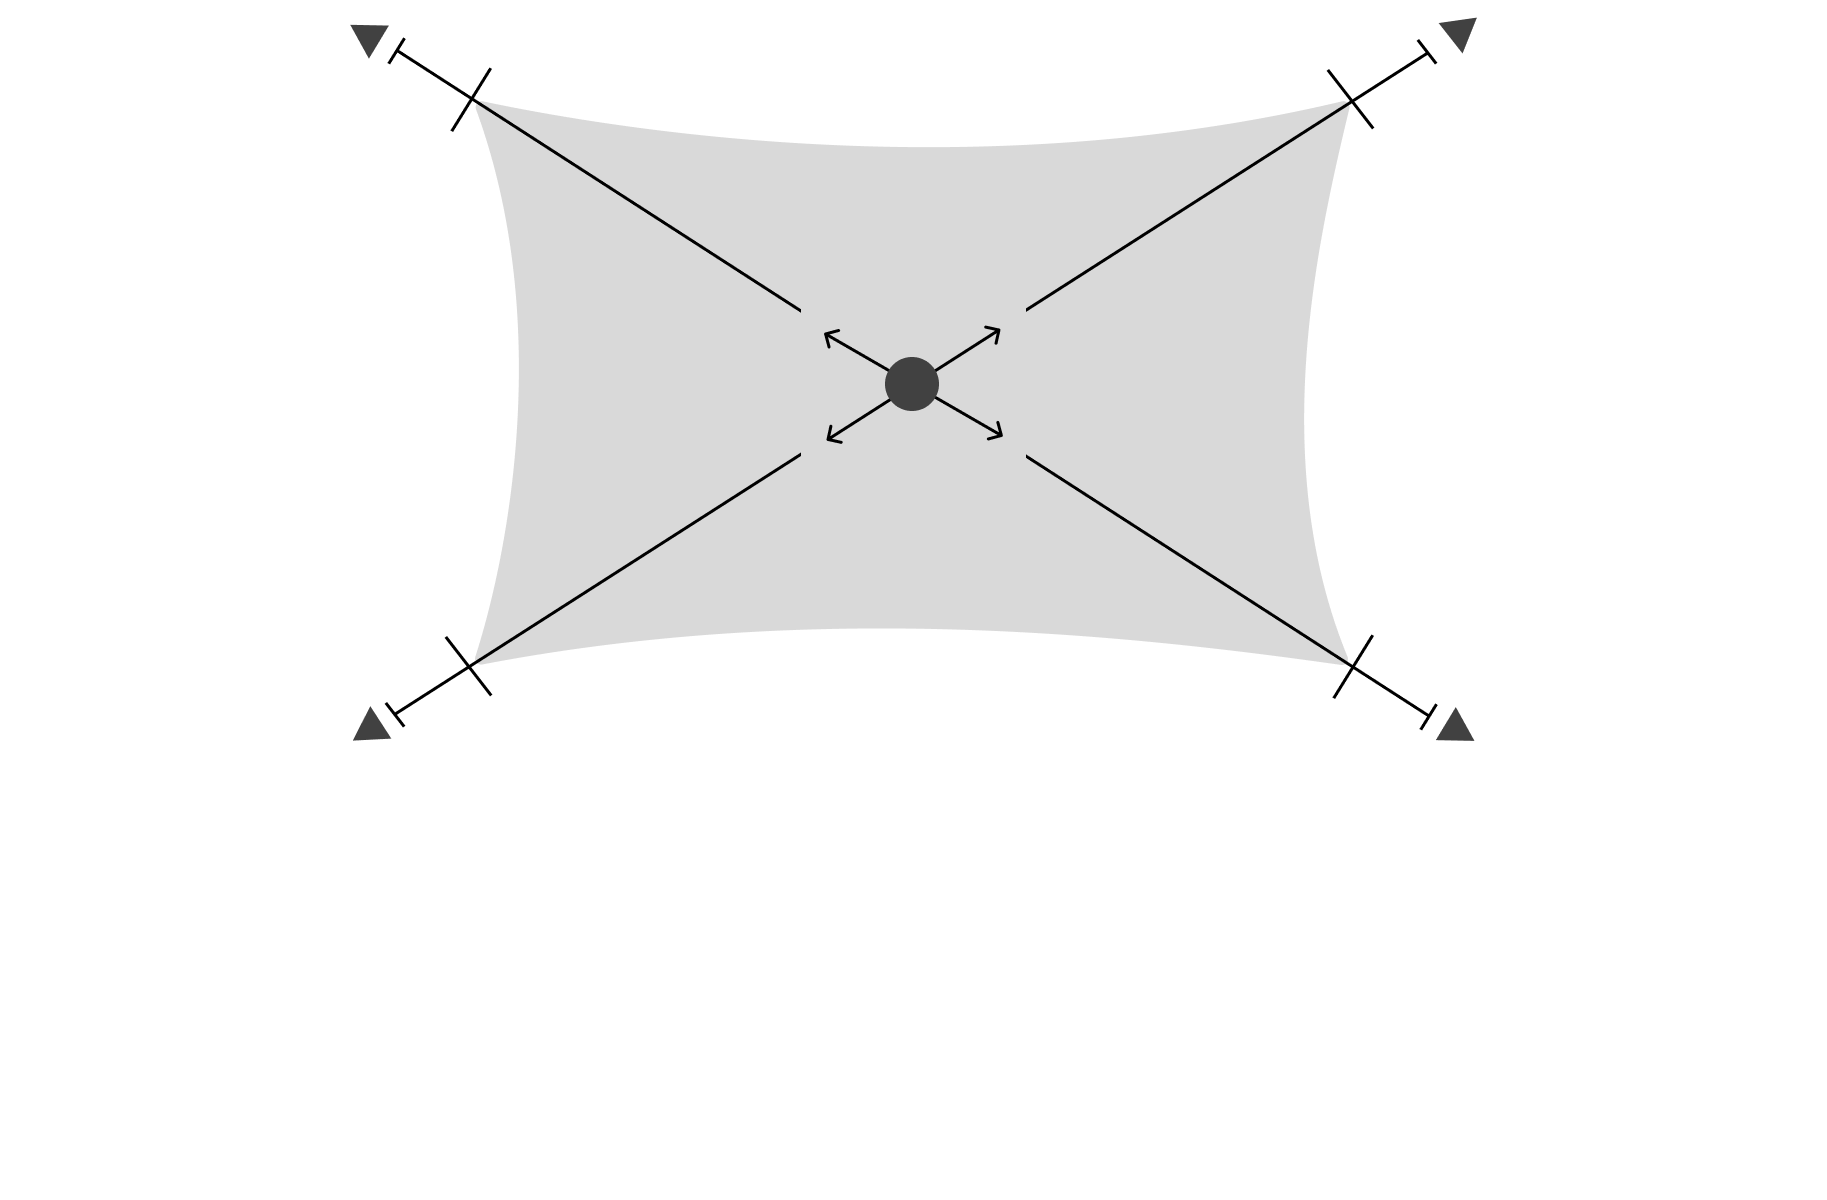
Make sure you are measuring from mounting point to mounting point, and not just measuring the area on the ground. It might help to determine and note down the height of each of your mounting points from the ground up, especially if you wish to anchor the shade sail onto walls.
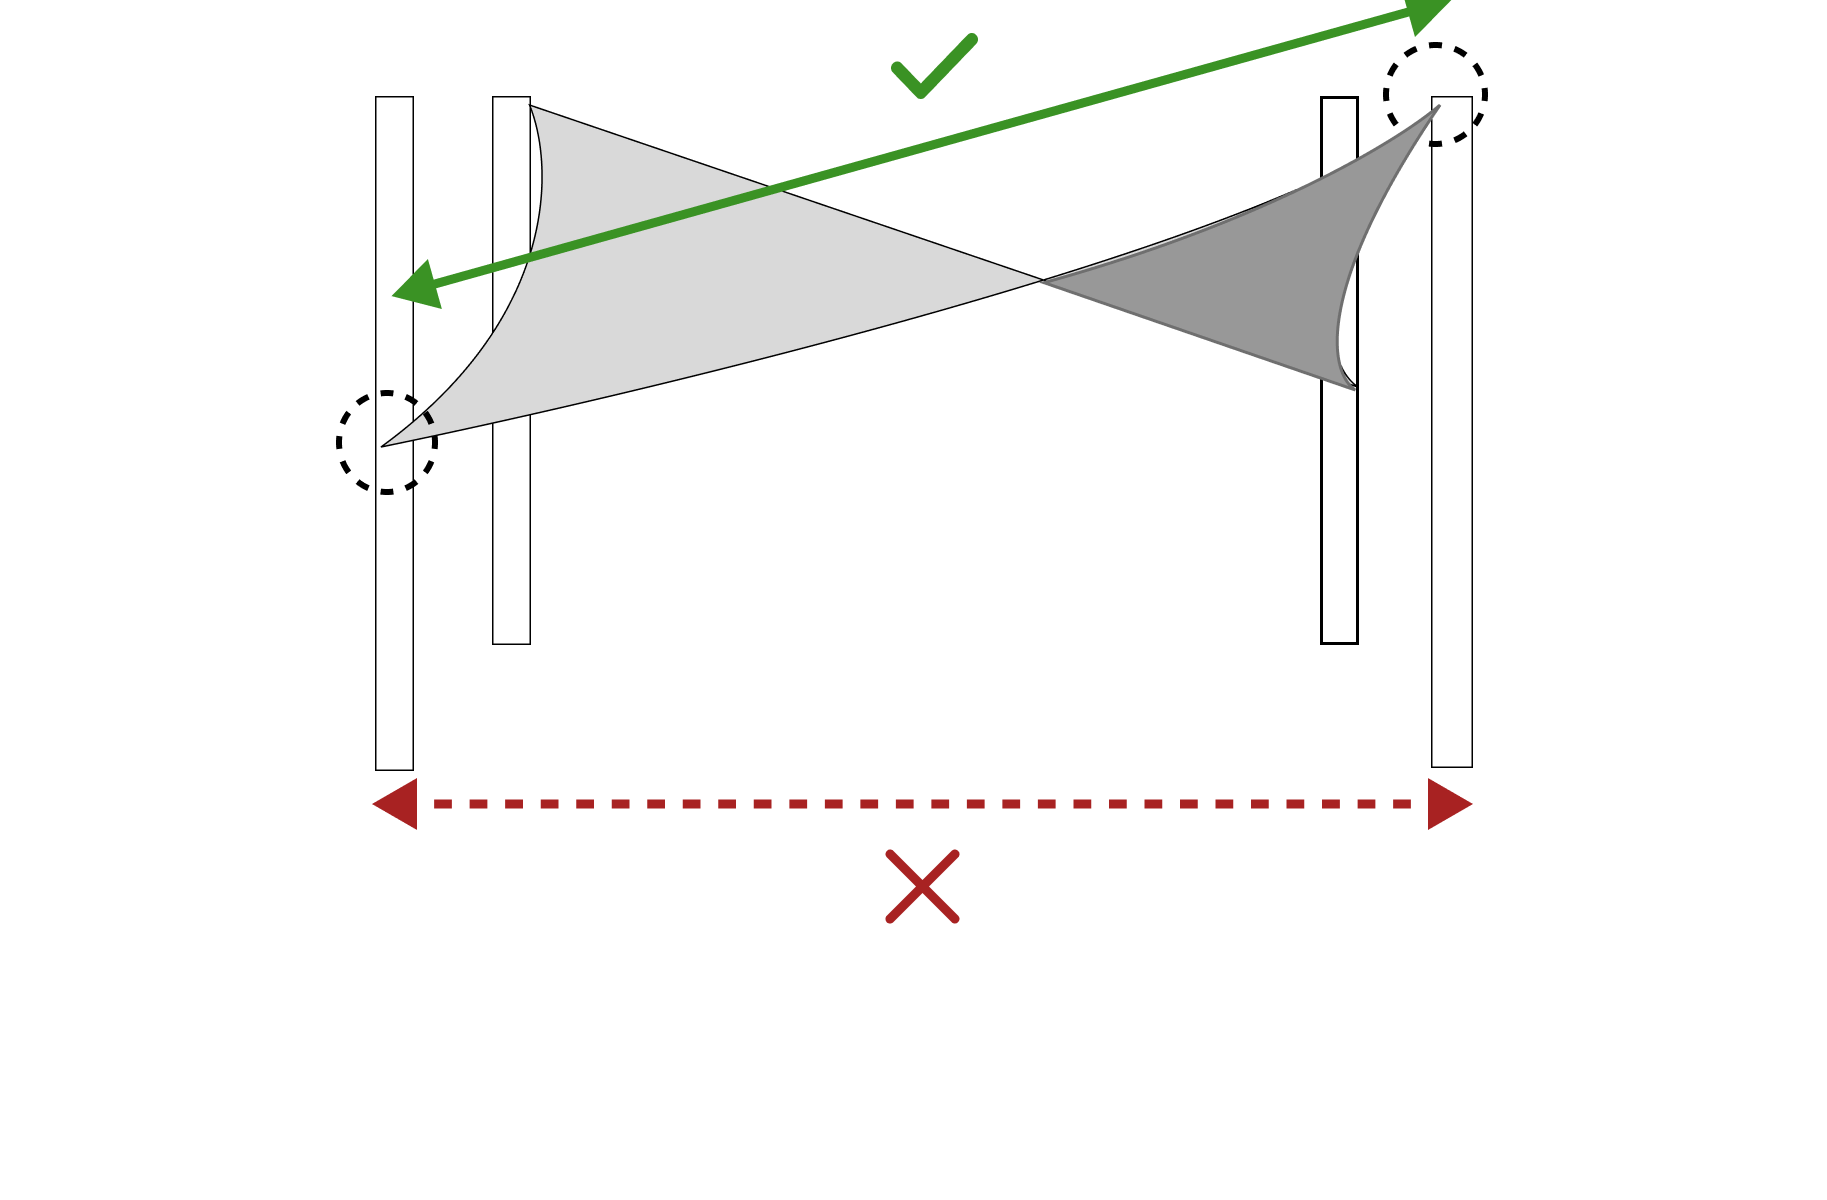
Different shaped shade sail requires different measurements to be taken
Triangular: 3 sides
Rectangular: 4 sides & two diagonal

We recommend measuring from anchor point to anchor point. Based on the numbers you provide we'll deduct 20 inches on the either the longest side or the longer diagonal (depending on which shade sail it is - specified on product page) while maintaining the shape to ensure a stable attachment, proper tension and minimize sagging.
If you wish to cover a large area try combining several pieces of shade sails together.
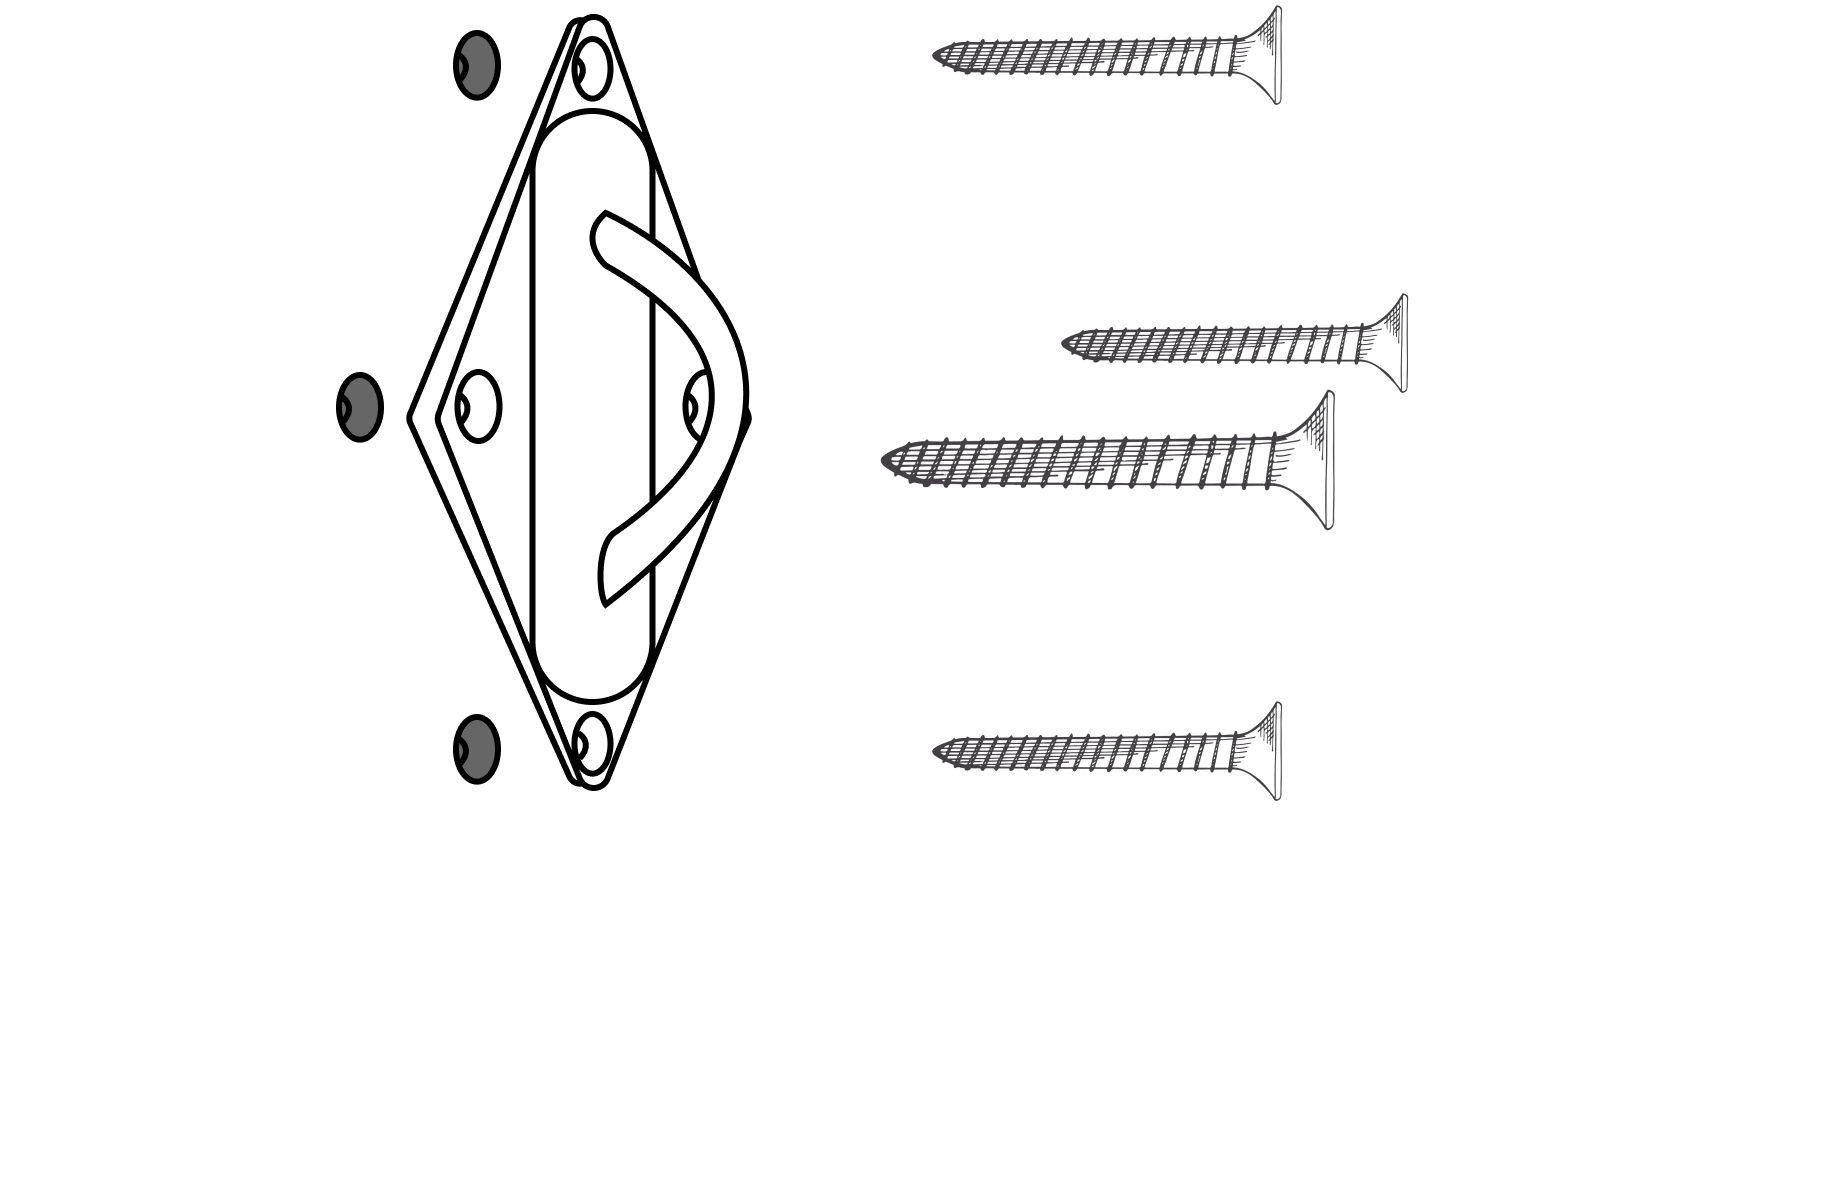
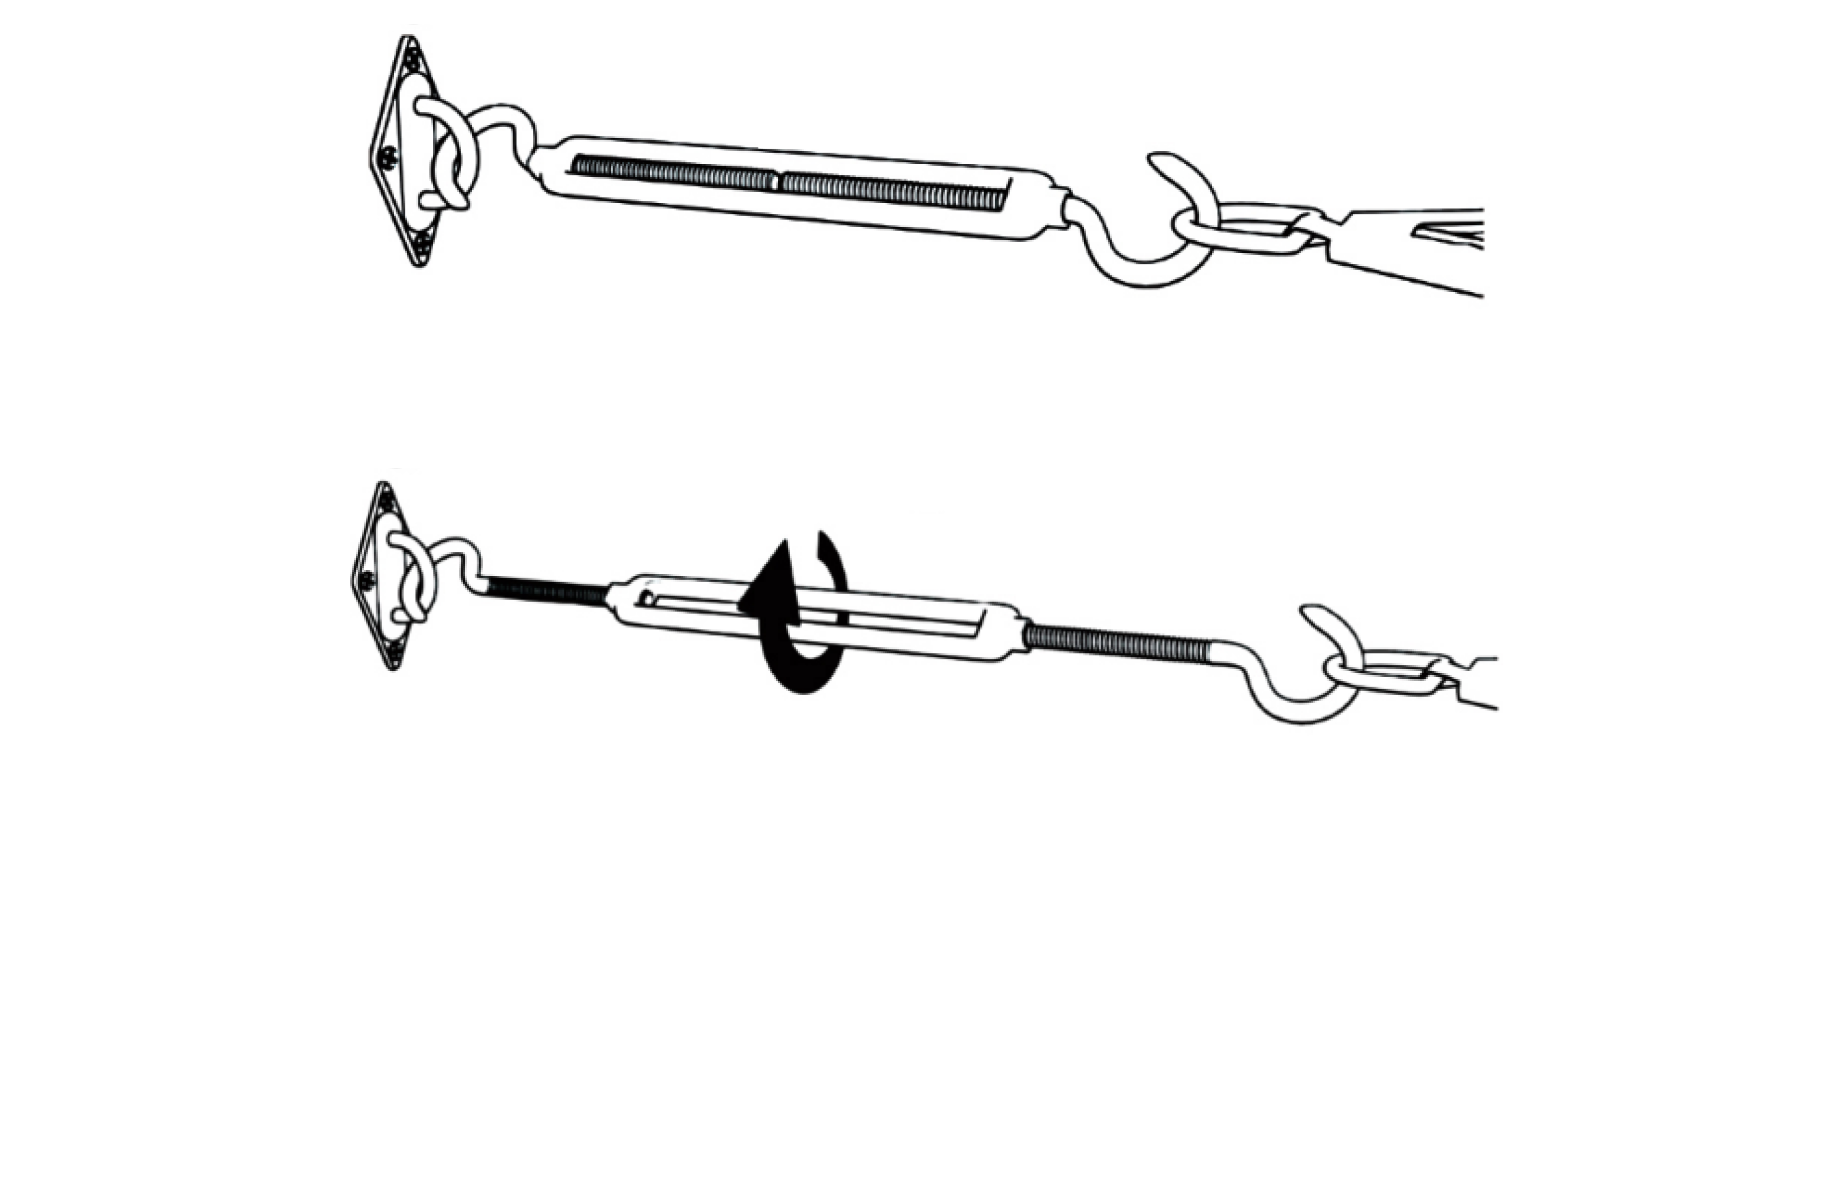
Place pad eye onto the determined mounting point and mark
the four holes.
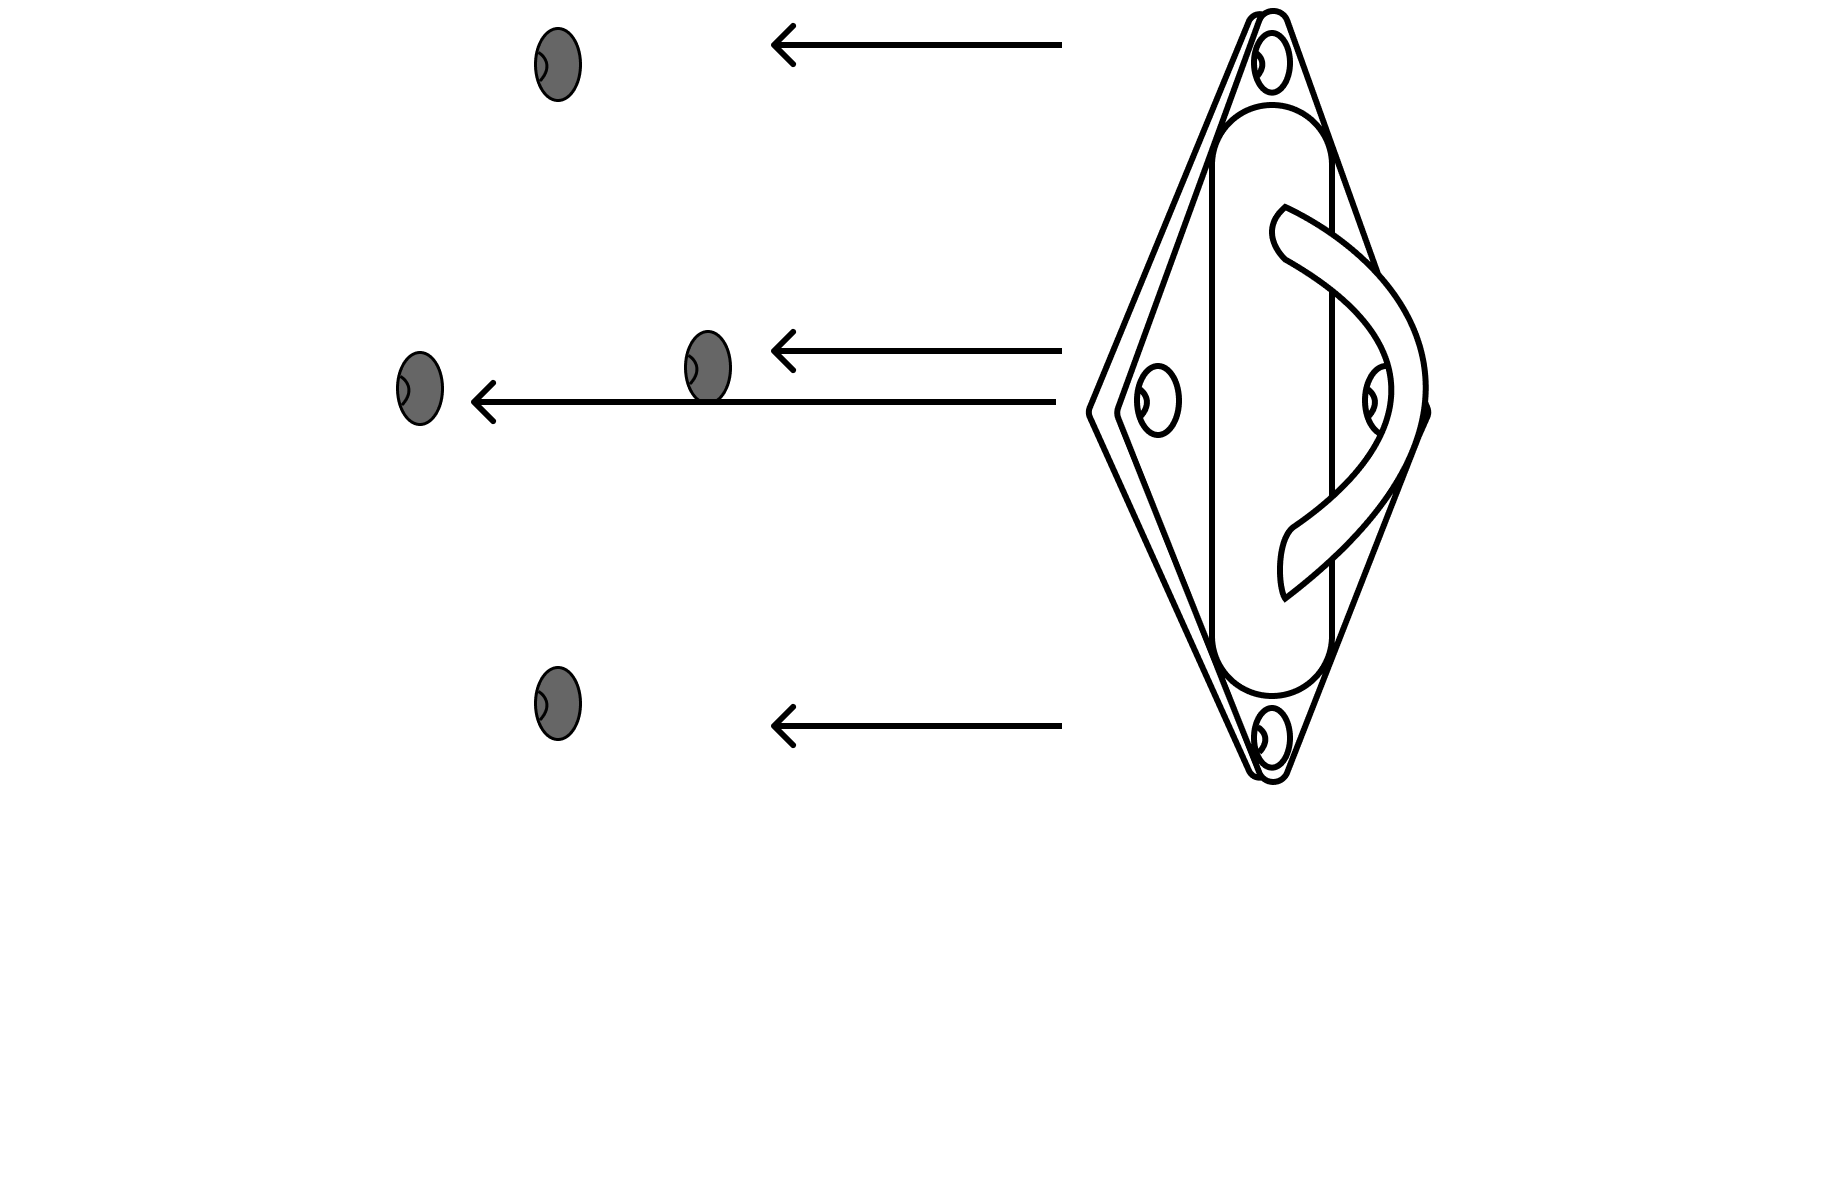
Use the corresponding sized drill bit to drill into marked
points and insert expansion inserts a. (e.g. M6 requires
6-mm diameter drill bit)
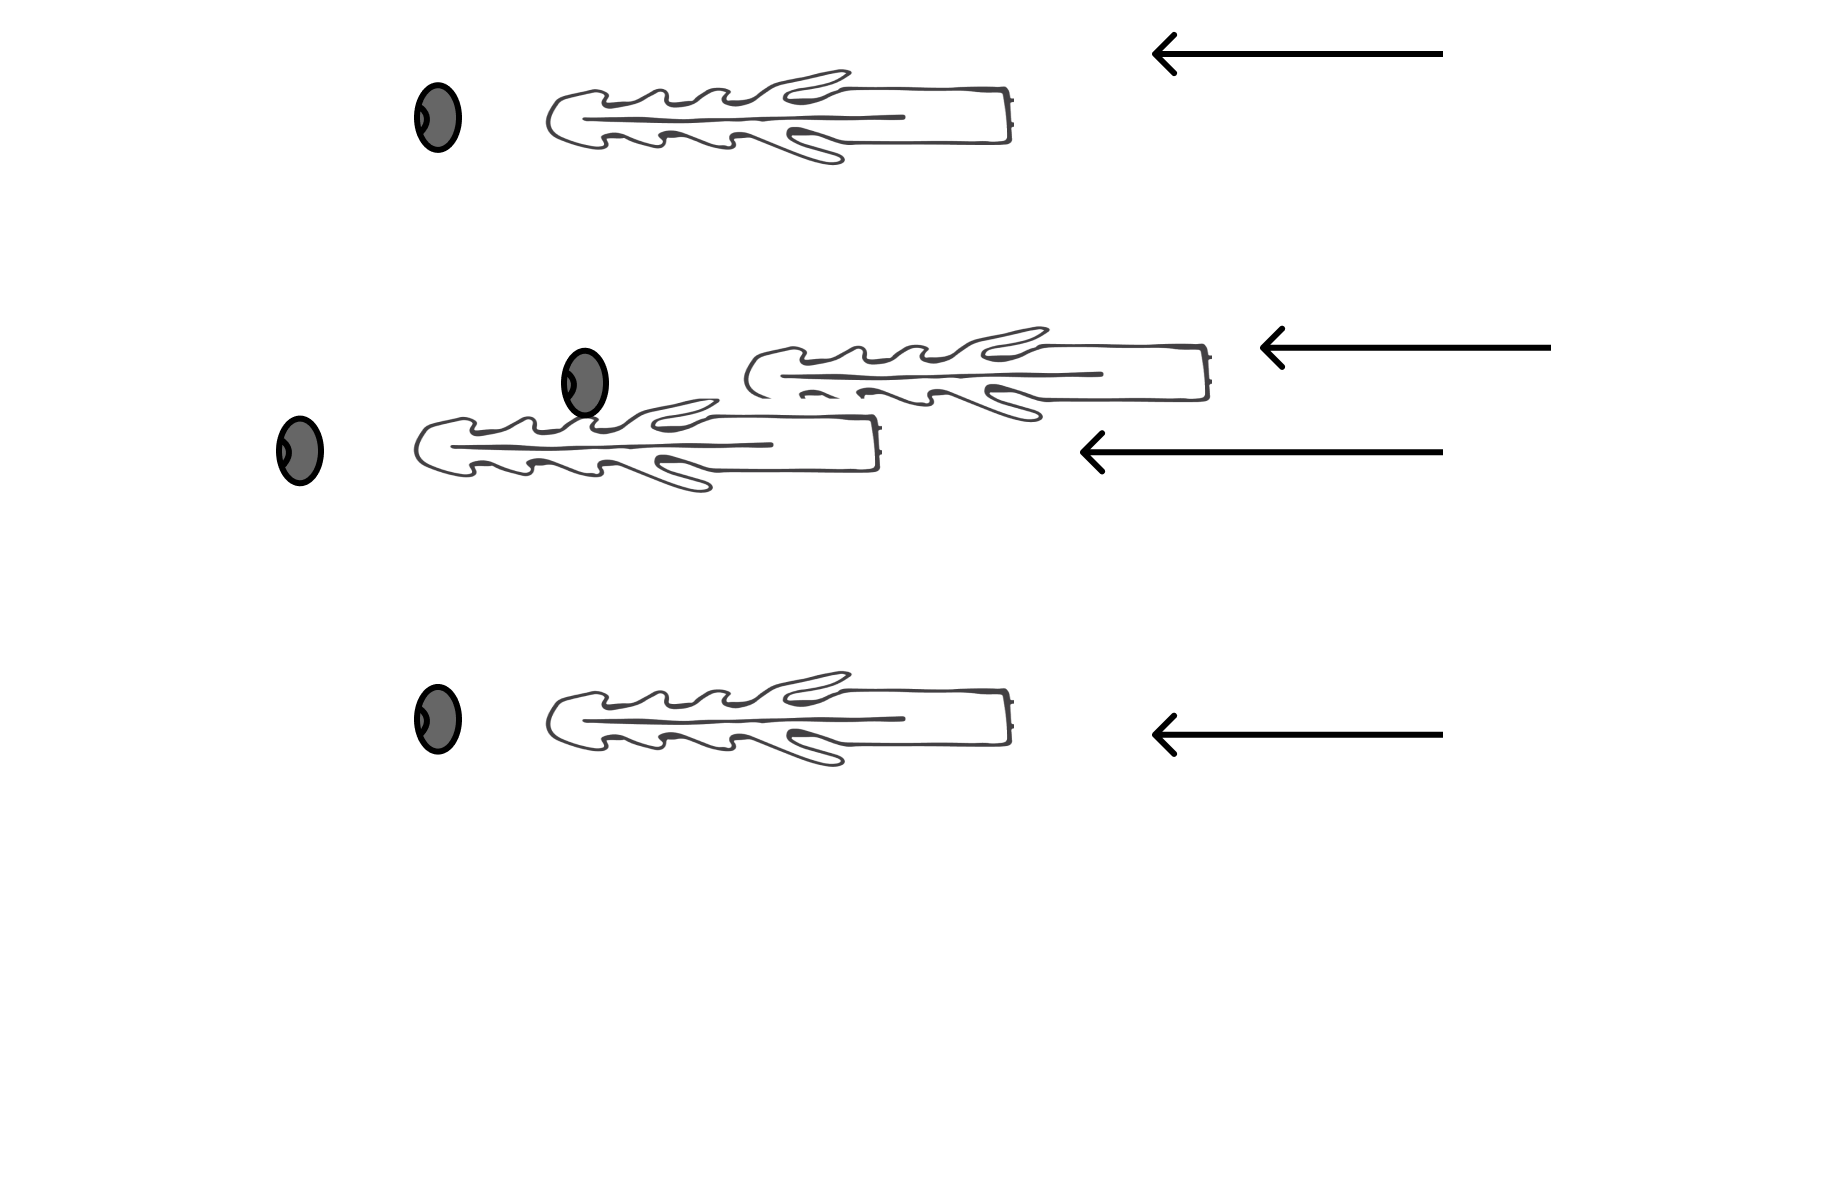
Place pad eye back on and secure with nails
Install snap hook or adjustable turnbuckles as needed and
make sure the tension of the shade sail surface is
correctly distributed. The shade sail should be flat and
evenly stretched out in all directions.
Ensure the mounting point direction is a continuation on
the diagonal of the shade sail surface for even tension
distribution.
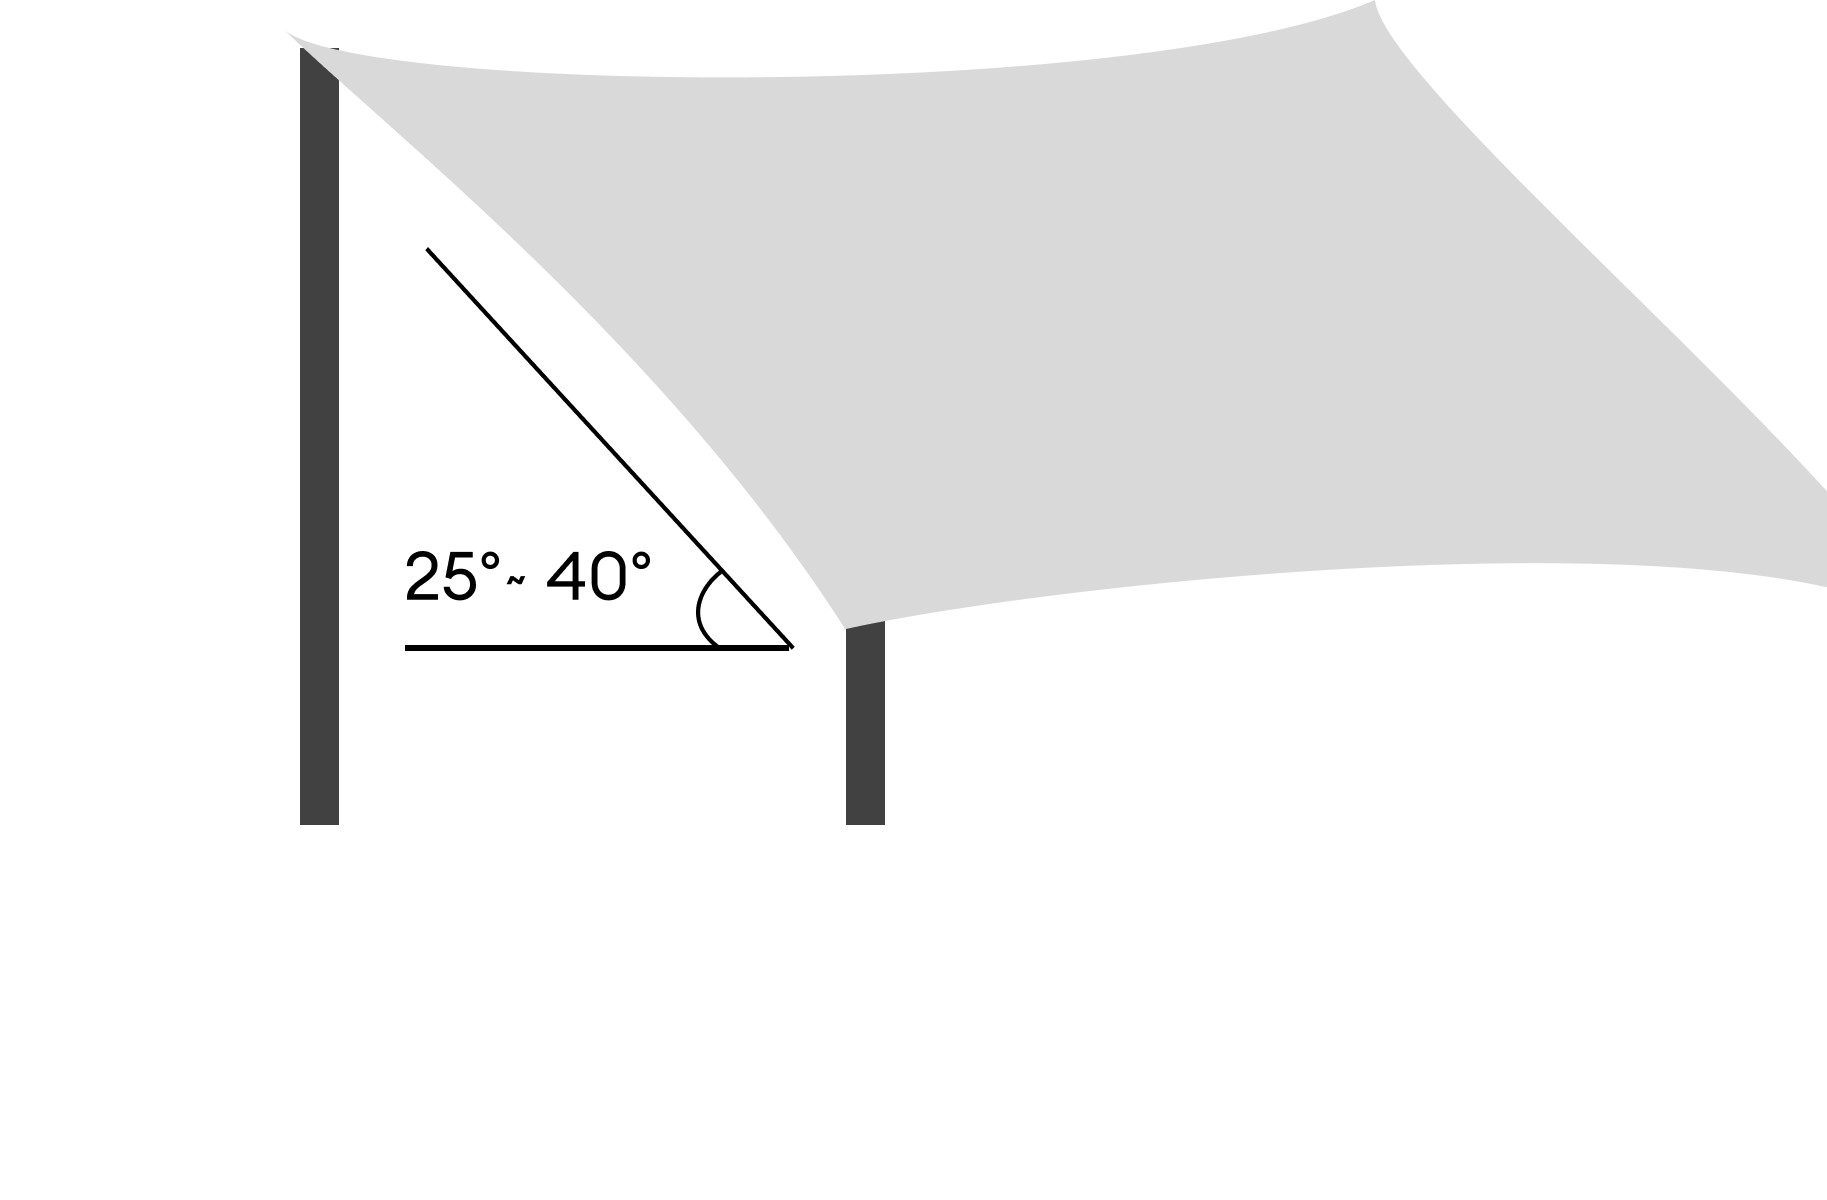
Make sure the shade sails are installed at least 40 degree
angle so that water can drain smoothly to prevent pooling
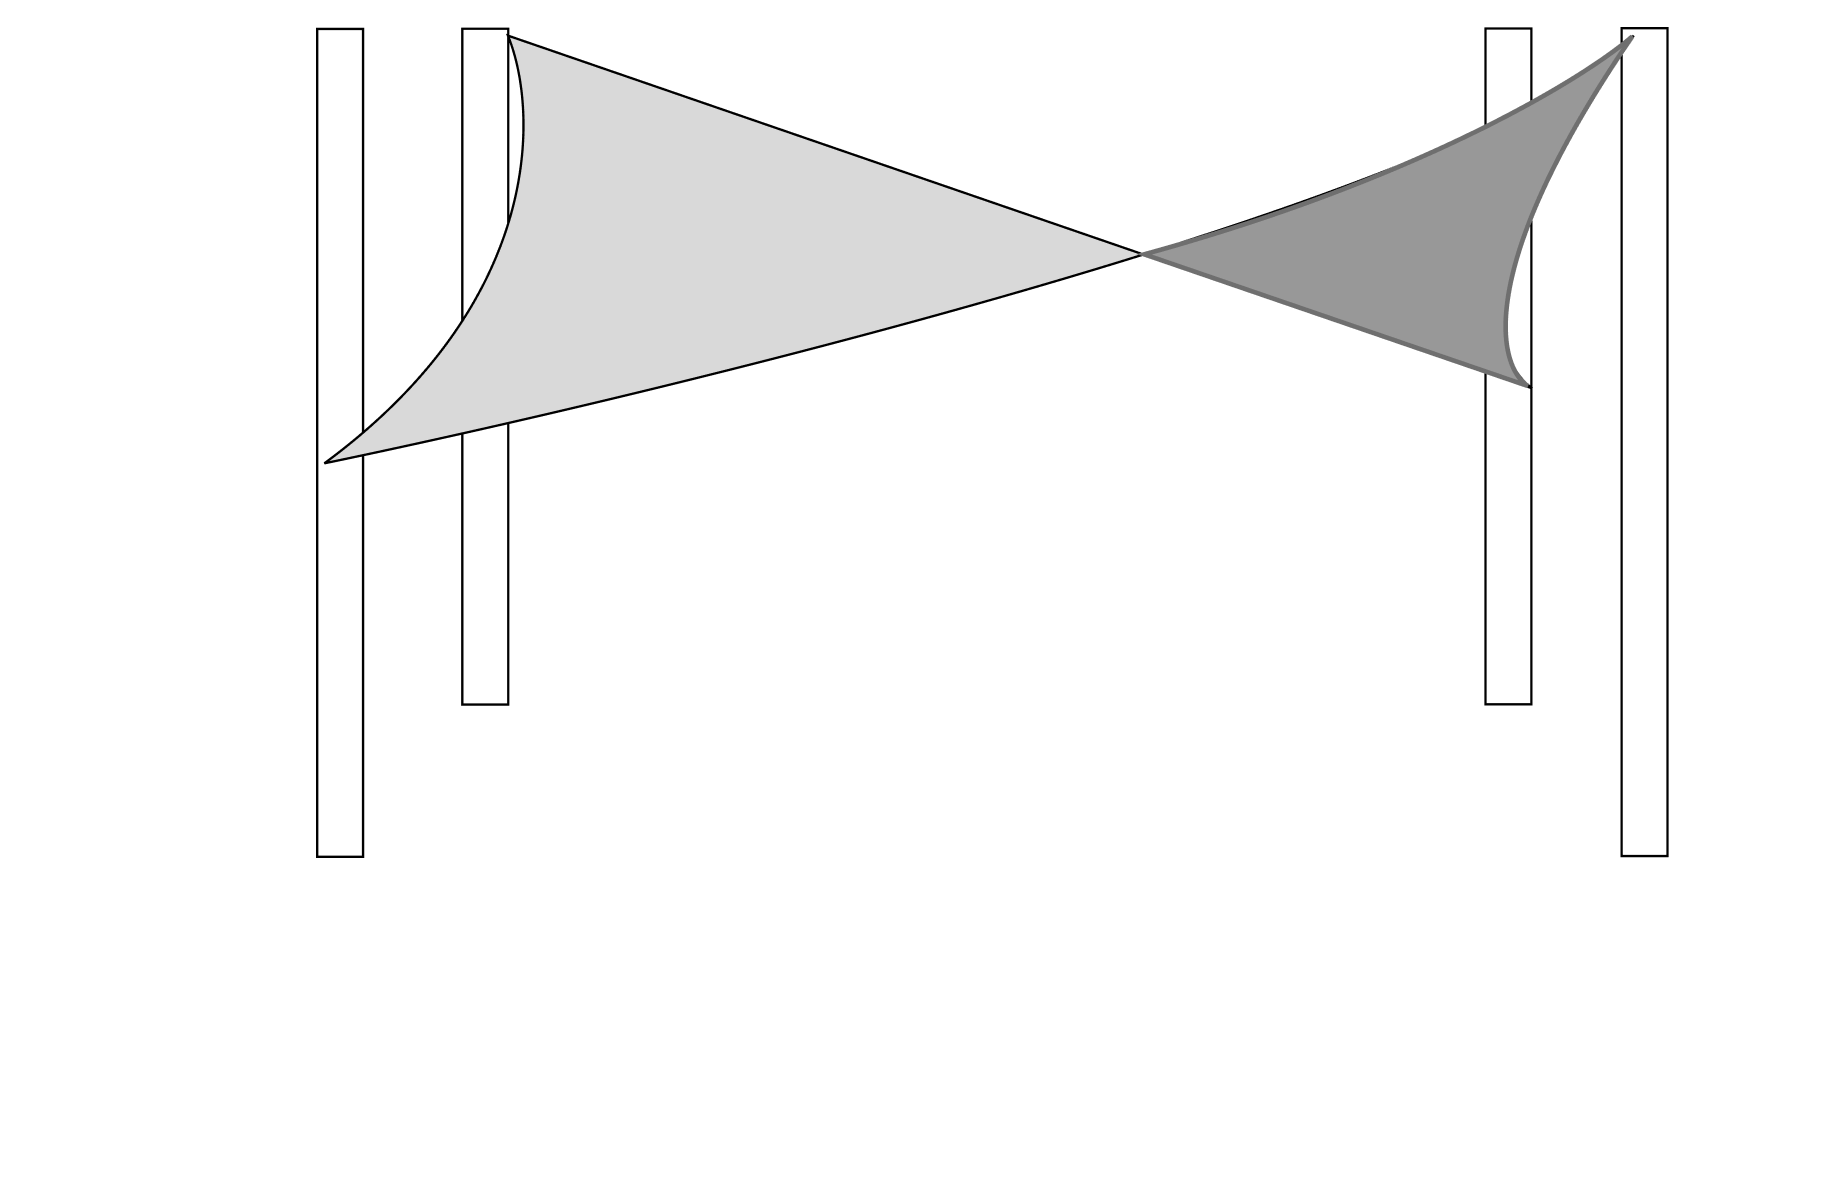
All corners of the shade sail need to be fully stretched
out and evenly distributed
Apart from hardware installation kit and ropes we also offer support pole and ring clip that can be used to secure shade sails
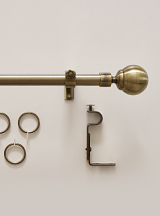
Customizable Fixed Length Curtain Rod
Curtain rods are one of the most used curtain hardware pieces, designed to be placed at the top of the window to hang curtains fixed on adjustable metal brackets.
Curtain rods are primarily designed for short to medium distances. They can be used for wider spans and require more brackets for support.
Max Load: 10-24 KG
Adjustable Curtain Rod
Adjustable curtain rods are used for lightweight to medium-weight curtains.
They feature a sliding system that allows the rod to extend and retract. This system enables you to set the exact length of the rod, adjusting it within a specified maximum and minimum size range, making it suitable for cost-effective and practical scenarios.
Max Load: 7-10kg/m
DIY Adjustable Tracks
Flexible in application, lightweight and easy to install, with customizable track length. Made of durable PVC, plastic curtain tracks are generally more flexible than metal, making them ideal for bay windows, especially curved ones.
Max Load: 7-10kg/m
Heavy Duty Metal Custom Tracks
Designed to prevent curtains from getting stuck in the track, these are ideal for tall windows. Most come with a Teflon coating to ensure smooth and quiet operation.
Max Load: 22-45kg/m
Consider the Curtain Weight and the Weight Capacity of Curtain Rods or Tracks
Lighter curtains work well with both curtain rods and tracks, but for heavier curtains, it's best to consider using a track with a pull handle for easier operation.
Using a track helps prevent curtains from getting stuck and is ideal for tall windows.
Appropriate Window Size and Shape for Accessories
Curtain tracks are most suitable for large, tall windows. The track's sliding system ensures smooth and convenient use for heavy, large curtains.
Curtain rods can be personalized to fit above the window, creating a unique aesthetic.
Choosing the Correct Installation Position
For bedrooms or spaces where light control is important, curtain tracks paired with blackout curtains are the best choice. These tracks can be easily installed within the window recess, allowing the curtains to completely block out the light from the entire window.
How to Measure
Determine Height: Measure the height above the window, approximately 4 inches (10 cm) to 6 inches (15 cm) from the floor, to determine the length of the curtain.
Determine Length: To determine the length of the curtain rod, measure the width of the window and then add about 8 inches (20 cm) to 12 inches (30 cm).
Keep in mind that some curtain styles have pleats or folds that extend to the top of the rod. Subtract this portion from the measurement.
If you want the room to appear taller, consider hanging the curtains closer to the ceiling to create a sense of height.
How to Install
Position the Rod: We recommend placing the curtain rod 10 cm above the window, with the length on each side extending 10 cm beyond the window width. You may need to trim the rod to the appropriate size to better fit the curtains. The packaging instructions should provide guidance on how to shorten the rod properly.
Mark the Bracket Placement: Mark the positions of the end brackets and holes, ensuring they are 10 cm away from the window edge. For heavy curtains or rods longer than 180 cm, a central bracket is also required.
Drill Holes and Install Brackets: Drill holes (and install plugs if needed), then screw in the brackets, making sure they are positioned correctly. Tighten all screws completely.
Install the Rod: Loosen the small screws on the bracket cups, place the rod into the brackets, and secure it into place.
Add the Finials: Loosen the small screws, add the finials to the ends of the rod, slide them on, and tighten the screws.
Final Adjustments: Center the rod and tighten the small screws on the bracket cups to secure it firmly.
Place the rod inside the window frame, twist to unlock, then extend the rod until it tightly hangs between the two inner edges of the window frame.
How to Measure Curtain Tracks
Measure the width of the window you wish to cover. The track width will be customized to fit your window.
Always ensure there is at least 1 inch of space between the end of the track and the wall to allow for easy addition or removal of carriers.
Typically, the track should extend 1 to 15 inches beyond the window (depending on your preference) and maintain at least 1 inch of clearance from the wall.
How to Install Curtain Tracks
Heavy Duty Track Installation
Top Mount
Step 1: Measure the Height and Width of the Installation Position
Measure the height and width of the area you want the curtain to cover to ensure the curtain and track are properly matched.
Step 2: Confirm the Installation Space
When measuring the track, decide whether you want to install it in front of the window (precise) or within the window opening (recessed).
Step 3: Mark the Bracket Hole Locations with a Pencil
Drill holes and insert wall plugs.
Step 4: Install the Curtain Track
Once all brackets are securely fixed, slide the curtain track into or clip it onto the brackets.
Side-Mounted Installation
If the track is being mounted on the side wall, mark the positions of the track at both ends. Draw a line between these points with a pencil and check if the line is parallel to the window.
As with top-mounted installation, leave at least 15 cm of space on either side of the window so the curtains can stack back neatly.
Once the bracket positions are marked, drill holes and secure the brackets with wall plugs. If installing directly into drywall, be sure to use appropriate drywall fasteners (sold separately).


