Yuki Lampenschirm aus gewebtem Leinen - Weiß
- From
- Normaler Preis
- $173.00
- Normaler Preis
-
- Verkaufspreis
- $173.00
Yuki Lampenschirm aus gewebtem Leinen - Weiß
- From
- Normaler Preis
- $173.00
- Normaler Preis
-
- Verkaufspreis
- $173.00
- From
- Normaler Preis
- $173.00
- Normaler Preis
-
- Verkaufspreis
- $173.00


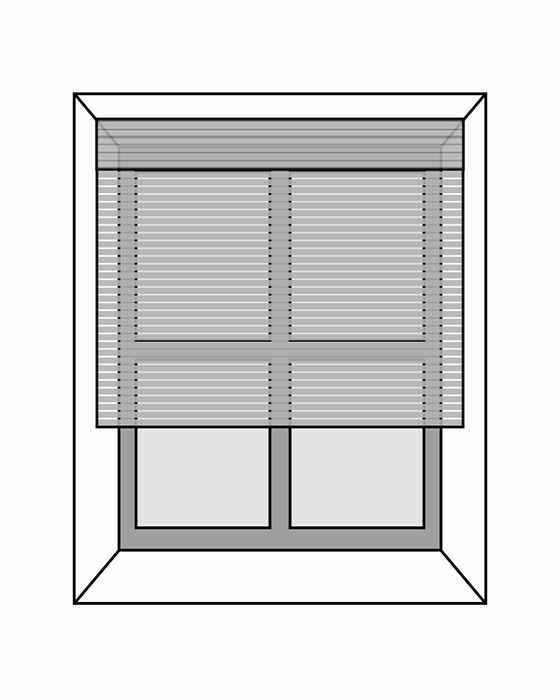
Total of 30-45% light blocked with the selected curtain with no liner
Produktdetails
Rezensionen
Installationsanleitung
Häufig gestellte Fragen
Specifications
- Material
- 60% Linen & 40% Jute
- Features
- Room Darkening
- Weight
- Lightweight (230g/㎡)
Care
- Do not wash or machine wash.
- For regular dust removal, use a feather duster or vacuum with a soft brush attachment.
- For small stains, gently scrub the area with a toothbrush dipped in foam cleaner or mild soap solution (following the direction of the weave). Wipe clean with a damp cloth and let air dry in a shaded, well-ventilated area.
- Avoid direct sunlight or heat when drying.
Handwerkskunst
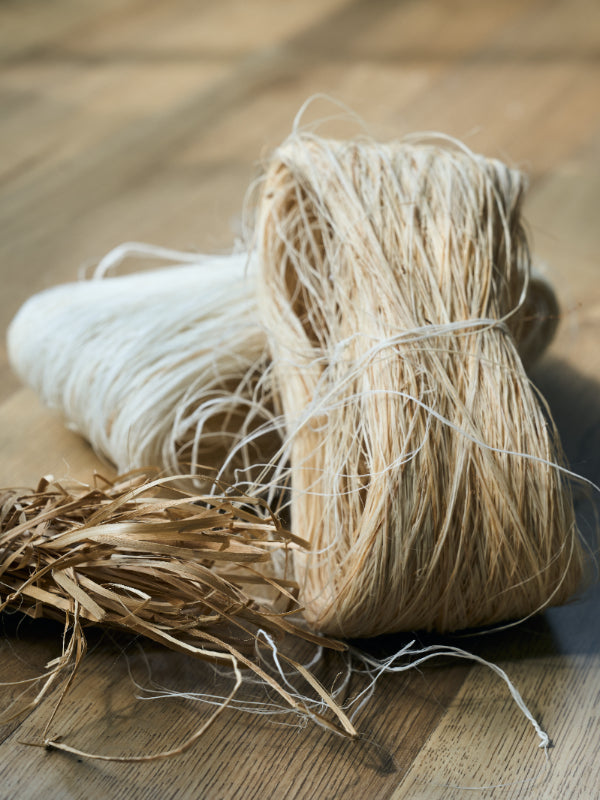
Bewahrt die natürliche Pflanzenstruktur und die natürlichen Astknoten für einen erdigen Geschmack.
- Handgewebt von Kunsthandwerkern
Jedes Stück ist ein Unikat, sorgfältig gefertigt in traditioneller Webtechnik.
- Naturfarbstoff
Ohne chemische Zusätze – sicher für Haushalte mit Kindern und Haustieren.
Funktionale Lampenschirme
- Blockiert 80 % der UV-Strahlen
Filtert das Sonnenlicht sanft und wahrt gleichzeitig die Privatsphäre.
- 50 % atmungsaktiver als Vorhänge
Durch die überlegene Luftzirkulation werden die Innentemperaturen im Sommer um 4-5 Grad Fahrenheit gesenkt.
- Natürlich insektenabweisend und schimmelresistent
Ideal für feuchte Klimazonen – bleibt lange frisch und haltbar.
Ein paar Dinge, die Sie vor der Bestellung wissen sollten
Farbvariation
Naturfasern können aufgrund unterschiedlicher Herkunft, Erntezeit, Klima und Lagerung leicht farblich variieren. Selbst innerhalb einer Charge können durch Lichteinwirkung und Oxidation leichte Farbverläufe auftreten. Wir bemühen uns um Farbkonsistenz bei Bestellungen innerhalb desselben Raumes. Bitte geben Sie daher bei Ihrer Bestellung die Raumnamen deutlich an.
Natürliche und handgewebte Eigenschaften
Unsere gewebten Grasvorhänge werden aus natürlichen Pflanzenfasern handgefertigt. Geringe Farbabweichungen, unregelmäßige Texturen, subtile Webspuren oder ein natürlicher Pflanzenduft sind normale Materialeigenschaften und beeinträchtigen die Leistung nicht. Diese stellen keine Qualitätsmängel dar und berechtigen nicht zur Rückgabe oder zum Umtausch .
Größentoleranz
Aufgrund der Beschaffenheit handgewebter Materialien können leichte Größenabweichungen (±1–2 cm), lose Fäden oder Fransenränder auftreten. Diese liegen innerhalb der branchenüblichen Toleranzen und beeinträchtigen die Nutzung nicht.
Umweltverträglichkeit
Da es sich bei gewebten Grasvorhängen um ein Naturfaserprodukt handelt, sollten sie nicht in Umgebungen mit hoher Luftfeuchtigkeit, großer Hitze oder übermäßiger Spannung verwendet werden. Schäden, die durch unsachgemäße Verwendung entstehen, sind nicht durch den Kundendienst abgedeckt .
Natürliche Farbalterung
Im Laufe der Zeit (normalerweise nach 6 Monaten) können Naturstoffe aufgrund von Lichteinwirkung, Oxidation und alltäglichen Umweltfaktoren leichte Farbveränderungen erfahren. Dies ist ein normaler Alterungsprozess und stellt keinen Mangel dar .
Natürliche Längenverlängerung
Aufgrund der Schwerkraft können sich Naturstoffe nach dem Aufhängen leicht dehnen, normalerweise um 1–2 cm. Dies ist eine normale körperliche Reaktion und stellt kein Qualitätsproblem dar .
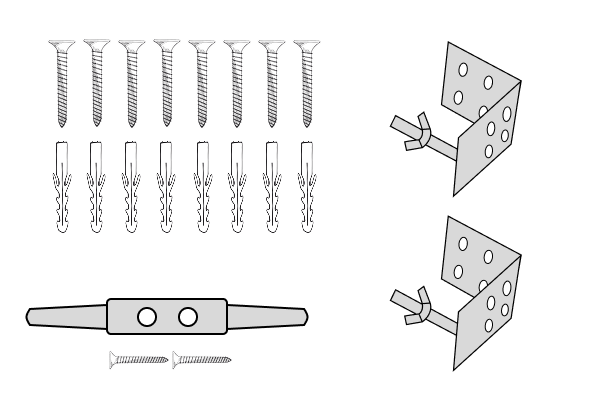
Montagesatz ohne Bohren
Einfache Installation ohne Beschädigung Ihrer Wände.
Passend für Schirme mit einer Breite von 30–120 cm (11,8–47,2 Zoll) und einer Höhe von 60–250 cm (23,6–98,4 Zoll) .
und kann bis zu 5 kg (11 lbs) tragen.
BITTE BEACHTEN: Dieses Set wird nicht für Rollos empfohlen, die die oben genannten Größen- oder Gewichtsgrenzen überschreiten. Eine Verwendung über diese Grenzen hinaus kann die Sicherheit beeinträchtigen und den Kundendienst ungültig machen.
Woven Shades Instruction Mannual
Inside Mount
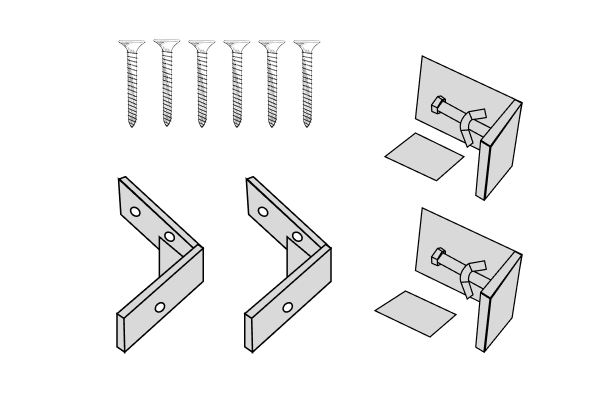
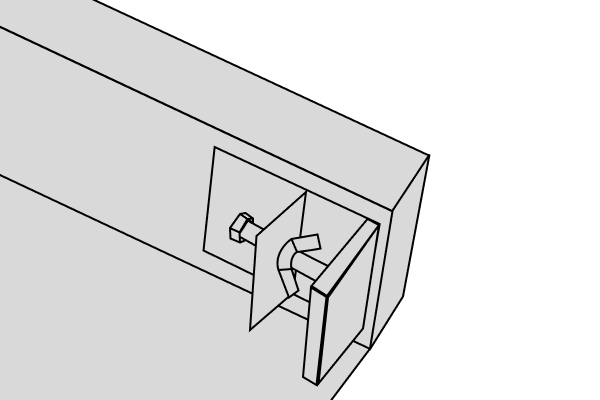
Drill-Mounting Installation (Inside Mount)
Accessories Included:
• L-shaped mounting brackets x2
• Expansion anchor x8
• 24mm screws x8
• Cord cleat x1 (Only included for corded shades)
• 11mm screws x2 (Only included for corded shades)
Make sure the bracket is installed with 1" (approx 2.5cm) clearance from the edge of the window frame to prevent the headrail from sticking out after installation.
Ensure symmetrical spacing between brackets. After confirming the location, mark the holes for drilling. Use an electric drill or screw drive to secure the brackets in place. If your wall is concrete textured please use the expansion screws for secure installation.
For inside mount, mounting brackets can be secured on top or on the side, depending on your space.

Once both brackets are installed, hold the headrail up and insert the bolt into the slit. Then rotate the nut until it is securely placed.
For corded shades, fix the cord cleat to the side of the window to coil shade cords, preventing accidental strangulation hazards for children and pets.

No-drill Installation (Inside Mount Only)
Installation Kit Includes:
• 13mm screws x6
• L-shaped brackets x2
• No-drill mounting bars x2
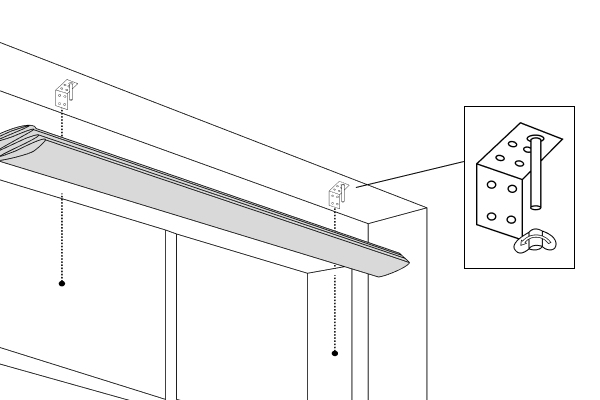
Assemble the mounting bars and L-shaped brackets as shown in the diagram
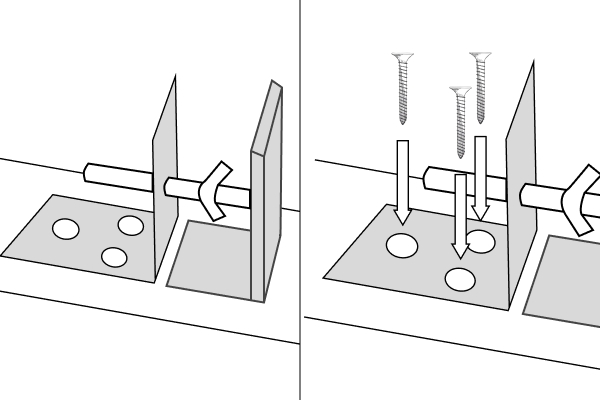
Place them flat against the inside of the headrail and tighten the screws
After both sides are installed:
1. Lift the headrail to the top of the window
2. Tighten the nuts (counterclockwise for the left; clockwise for the right)
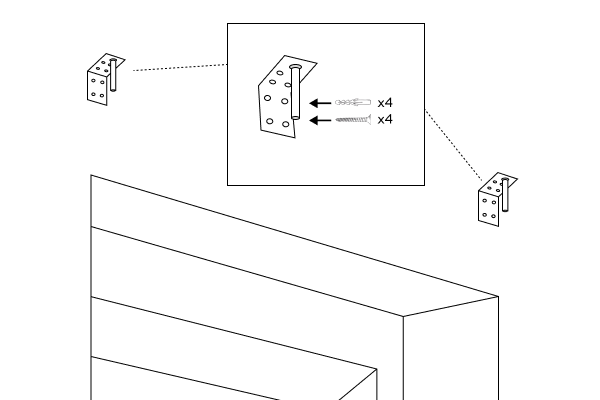
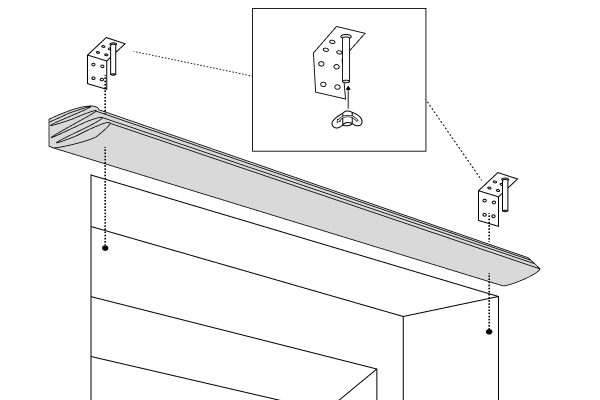
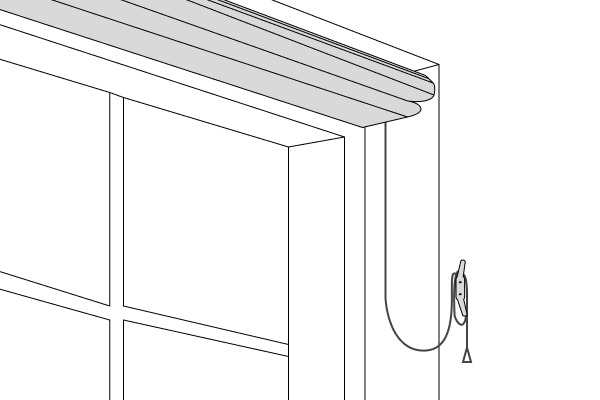
Outside Mount
Drill-Mounting Installation (Outside Mount)
Accessories Included:
• L-shaped mounting brackets x2
• Expansion anchor x8
• 24mm screws x8
• Cord cleat x1 (Only included for corded shades)
• 11mm screws x2 (Only included for corded shades)

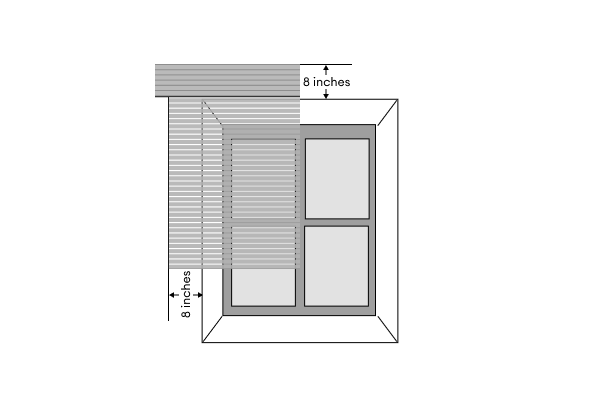
1. For optimal coverage and a finished look, we recommend installing the headrail 8 inches above the
window frame.
2. The width should be 8 inches wider than your window frame on each side for better coverage (16 in
total)
Make sure the brackets are leveled and mark the drilling holes.
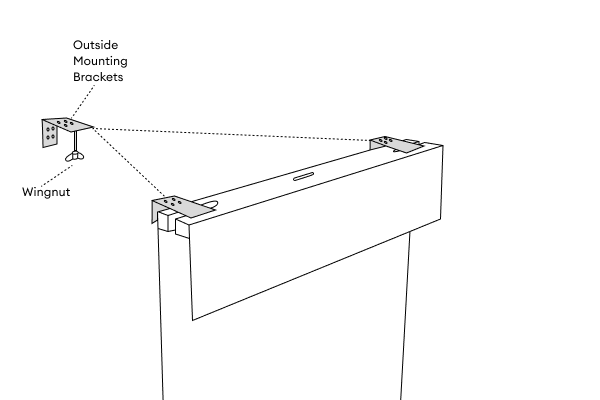
Use an electric drill or screw drive to secure the brackets in place. Please use expansion screws if drilling into concrete surfaces.
Once both brackets are installed, hold the headrail up and insert the bolt into the slit. Then rotate the nut until it is securely placed.
For corded shades, fix the cord cleat to the side of the window to coil shade cords, preventing accidental strangulation hazards for children and pets.

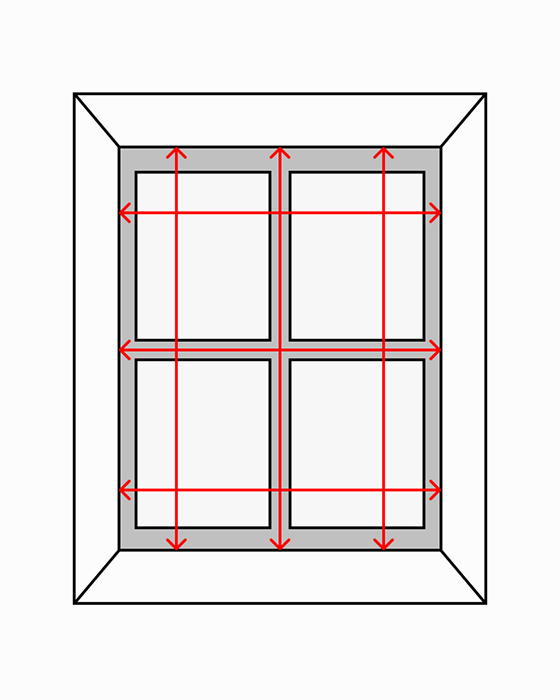
- Step 1: For WIDTH, measure the top, middle and bottom portion of the inside frame and use the narrowest width measurement. Then deduct 2/5” to ensure proper usability.
- Step 2: For LENGTH, measure the left, center and right portion of the inside frame and use the longest height measurement.
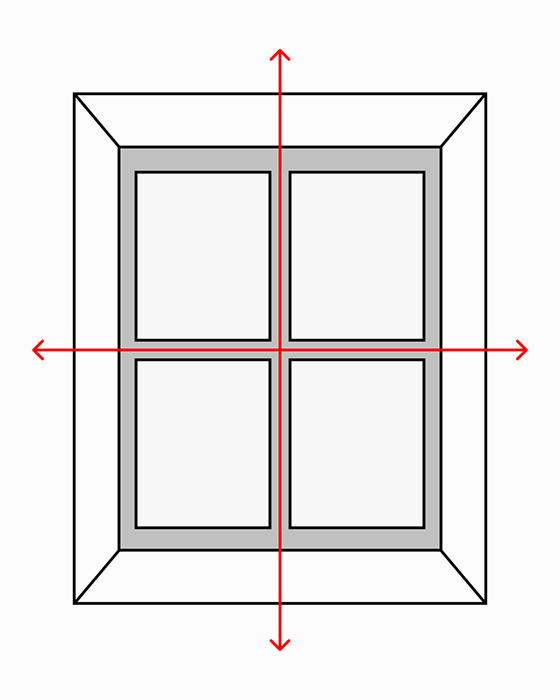
- Step 1: For WIDTH, measure the top, middle and bottom portion of the inside frame, then add 4-8” on each side to improve coverage and reduce light gaps.
- Step 2: For HEIGHT, measure from 4-8" above the window, down to where you want the shade to sit.

STEP 1
SELECT YOUR MOUNTING TYPE
 INSIDE MOUNT
 OUTSIDE MOUNT
STEP 2
MEASURE WIDTH

Our system will automatically deduct 1.5cm to ensure proper usability.
STEP 2-2
ADD EXTENSIONS

STEP 3
MEASURE HEIGHT


STEP 4
YOU'RE ALL SET!
Based on the information provided, our recommended order details are as follows: