Shade sail posts and footings guide: what to get right first


A shade sail can make a patio, deck, pool area, or backyard dining space more comfortable, but the fabric is only one part of the project. The posts, footings, anchor points, slope, and hardware decide whether the sail stays tight, drains correctly, and looks clean after installation.
If you are planning a shade sail setup, slow down before choosing the final size. Most problems happen when the sail is ordered before the anchor plan is clear. Undersized posts, shallow footings, weak mounting points, and flat layouts can all lead to sagging fabric, leaning anchors, or water pooling.
This guide explains how to think about shade sail posts, footing depth, footing width, slope, and common planning mistakes. It is not a substitute for local code guidance or a professional installer, but it will help you ask better questions before you dig, drill, or order.
If you are still mapping the layout, start with the TheHues shade sail measurement guide. It can help you plan anchor spacing, size deduction, and hardware allowance before the sail has to perform under tension.
Quick answer: what matters most for shade sail posts and footings?
The most important rule is simple: size the structure for the load, not just for the fabric size. A small triangle sail in a protected side yard is not the same project as a large waterproof rectangle stretched over an exposed patio.
Your post and footing plan depends on several conditions at the same time:
- sail size and shape
- fabric type, including breathable or waterproof material
- wind exposure and local weather
- soil conditions and frost depth
- post height and anchor position
- whether the sail is permanent or seasonal
Because those variables change from yard to yard, there is no single universal post depth or footing size that works for every shade sail. Use online rules of thumb only as a planning starting point, then confirm the final structure based on your site.
A better planning order is:
- Decide where the shade actually needs to land.
- Confirm which anchor points are structural enough to carry tension.
- Choose the sail shape and material.
- Size posts and footings around that real layout.
- Build in enough height difference for tension and drainage.
Once the anchor plan is clear, compare options in the TheHues sun shade sail collection. Choosing the sail after the layout is safer than forcing a layout around a size you already bought.
What changes the load on shade sail posts?
The easiest mistake is assuming every shade sail pulls the same way. Shape, fabric, slope, and exposure all affect how much stress the posts and anchors need to handle.

Shape changes how the force is distributed
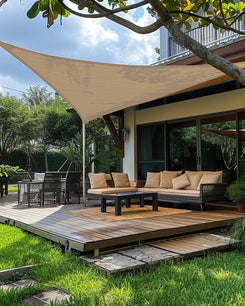
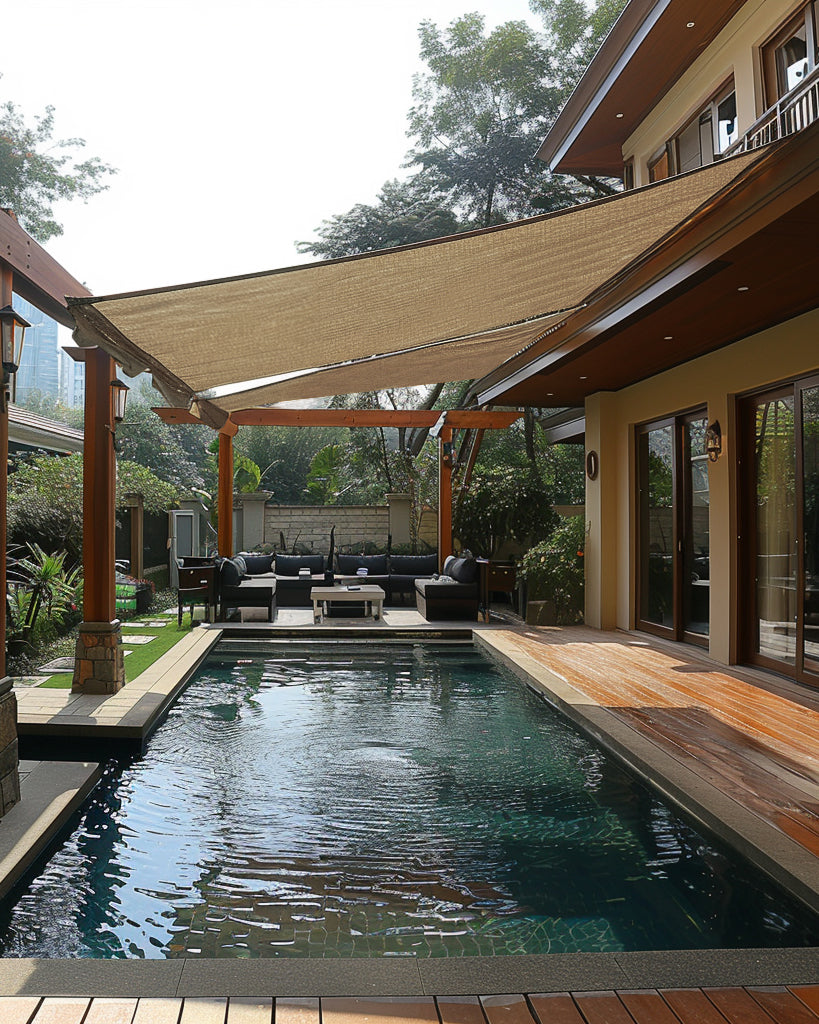
A triangle shade sail uses fewer corners, but each corner still carries meaningful tension. A square or rectangle sail can cover more usable area, but it often asks more from the structure because there is more fabric span and more surface area for wind or rain to affect.
Long, narrow layouts need extra caution. They may look efficient in a sketch, but they can create uneven pull or awkward coverage once the sail is tensioned. When possible, plan the shape around both shade coverage and structural balance.
Waterproof and breathable sails behave differently
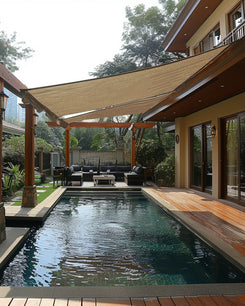
A breathable shade sail is mainly about shade and airflow. A waterproof shade sail also has to manage rain runoff. That makes slope and drainage more important from the beginning.

If you are choosing a UVShield waterproof custom triangle sun shade sail, treat slope as part of the structure, not just a visual choice. Water needs a clear path off the fabric so it does not collect in the center.
If you are choosing a breathable option such as the HDPE breathable custom rectangle sun shade sail, drainage pressure is usually lower, but tension, anchor quality, and wind exposure still matter. Breathable does not mean the structure can be casual.
Wind exposure changes the structure you need
Two yards can use the same sail size and still need different post plans. A sheltered side yard with fences and trees is different from a raised deck or open corner patio that catches afternoon wind.
If the location is exposed, plan more conservatively. Wind can test the anchors, posts, hardware, and fabric edges over time. A shade sail should be planned as a tensioned outdoor structure, not as a loose piece of fabric hung over the patio.
What kind of posts should you use for a shade sail?
There is no one post material that works best for every home. Wood and steel can both work, but they have different strengths and watch-outs.

Wood posts
Wood posts can look warm and natural in a residential yard, especially near a deck, fence, pergola, or garden space. They may be appropriate for smaller, more sheltered shade sail setups when the post size, treatment, and footing are chosen correctly.
The main mistake is treating a shade sail post like a basic fence post. A shade sail post is resisting pull from a tensioned fabric system, not simply holding up a vertical fence line. That is why a casual “4x4 should be fine” approach can become risky on larger sails, taller posts, waterproof fabrics, or wind-exposed sites.
Steel posts
Steel posts often make sense for larger spans, slimmer visual lines, or layouts where stiffness is especially important. They can be a cleaner design choice for modern patios because the post can look lighter while still supporting a more demanding installation.
Steel still needs proper footing, corrosion-appropriate finish, and hardware planning. A strong post with a weak base is still a weak system.
| Post type | Usually better for | Main watch-out |
|---|---|---|
| Wood posts | Smaller residential installs, warmer outdoor style, pergola-adjacent layouts | Do not assume standard fence-post sizing is enough |
| Steel posts | Larger spans, exposed yards, slimmer modern designs | Still needs a serious footing and clean hardware plan |
Permanent vs. removable posts
Removable shade sail posts can be useful if you want seasonal flexibility, but they are not a shortcut around structure. A removable system still needs a secure base condition and a hardware plan that matches the sail load.
Decide early whether the sail will stay up most of the season or come down often. That choice can affect post type, hardware, tensioning, and how much maintenance the setup needs.
How deep should shade sail posts go?
This is one of the most common shade sail questions, and it is understandable. Homeowners want a clear number before they start digging.
Use rules of thumb carefully
You may see general guidance suggesting that a portion of the post should be buried below ground. That can be useful for early planning, but it should not be treated as a final answer for every yard.
Post depth depends on the sail size, post height, soil, wind exposure, frost conditions, and local code expectations. If the project is large, exposed, waterproof, or close to a structure, it is worth checking with a qualified installer or local building professional before committing to a footing plan.
Why one simple answer does not work
Depth is not just about how tall the post is. It is about what the post is resisting.
Post depth may need more caution when:
- the sail is large
- the yard is exposed to wind
- the soil is loose, sandy, or unstable
- the climate has freeze-thaw movement
- the sail is waterproof and needs controlled runoff
- the post is tall, which increases leverage at the base
If frost depth is a factor in your area, treat the footing plan as a local-code question, not a guess from a generic online guide.
Do not skip the dig-safety step
Before digging any new footing, contact 811 Before You Dig or your local utility-marking service. Even backyard projects can run into buried utility lines, irrigation, or other hidden systems.
This step is easy to overlook because a shade sail can feel like a simple weekend upgrade. The post holes are still real digging work, and they should be treated with the same caution as fence, mailbox, or landscape structure projects.
How wide should shade sail footings be?
Depth gets most of the attention, but footing width matters too. A post that resists lateral pull needs a footing that can help keep it stable, not just deep enough to stand upright.

Narrow footings can become a weak point
When a footing is too narrow for the load, the post can start shifting even if the hole sounded deep enough on paper. Once one post moves, the rest of the system starts compensating, and the sail may sag, twist, or pull unevenly.
Concrete helps, but concrete alone does not fix a poor layout. The post, footing, anchor spacing, hardware, and sail geometry all need to work together.
| Variable | What it usually means for footing planning |
|---|---|
| Larger sail | More load, often requiring more conservative footing design |
| Waterproof fabric | More attention to slope, runoff, and structural stress |
| Wind exposure | More lateral stress on posts and anchors |
| Weaker soil | More caution with footing depth, width, and stability |
| Taller posts | More leverage working against the base |
Why slope and post angle matter
Slope is not just a finishing detail. It is part of how a shade sail works, especially if the sail is waterproof.

Height variation helps with tension and drainage
A shade sail needs tension to look clean and perform well. A waterproof sail also needs a clear path for rainwater to leave the fabric surface. If all anchor points sit too flat, water can collect and add stress.
The TheHues measurement guide recommends ordering the sail smaller than the full anchor-to-anchor space so hardware and tensioning have room to work. That deduction is not a minor detail. It is part of creating a layout that can be tightened correctly.
A flat waterproof sail can create pooling
A flat layout may look balanced when dry, but rain can quickly show the weakness. If water pools in the middle, the fabric, seams, hardware, and posts may all carry more stress than intended.
For waterproof shade sails, plan the height difference before ordering. For breathable sails, slope is still helpful for tension and appearance, but drainage is usually less demanding.
Post angle is not a fix for undersized structure
Some shade sail installs use a slight lean-back on purpose-built posts so the post resists load more effectively once the sail is tensioned. That can be useful in the right system, but it does not make up for weak posts, shallow footings, or poor anchors.
Angle should support the structural plan, not replace it.
Common shade sail post and footing mistakes
By the time a shade sail looks visibly wrong, the main mistake usually happened earlier in the planning stage.
Ordering the sail to match the exact space
Do not order the sail to match the full anchor span. Hardware needs room. Turnbuckles need room. Tensioning needs room.
If the sail is too close to the anchor-to-anchor distance, you may not have enough adjustment space to tighten the fabric correctly.
Trusting weak anchor points
Siding, trim, fence panels, decorative fascia, and light pergola members are not automatically safe anchor points. They may feel solid by hand but still be wrong for a tensioned sail.
If you are mounting into a house, verify the structure behind the surface. If you are using a post, treat it as a structural member from the beginning.
Assuming tighter is always better
A shade sail should be tensioned properly, but over-tightening is not a cure for poor planning. If a post leans, a wall plate looks strained, or one corner keeps taking all the adjustment, stop and reassess the structure.
Using a sail when another outdoor solution fits better
A shade sail is excellent for overhead sun control. It is not always the best tool for side privacy, low-angle glare, or soft enclosure around a porch or pergola.
If your main problem is privacy from neighbors or side glare, outdoor curtains may be a better fit. In many outdoor spaces, shade sails and curtains can also work together: one handles overhead sun, while the other helps with side coverage and softness.
Step-by-step planning checklist before you dig or order
Use this checklist before locking in a final shade sail size:
- Watch when and where your patio gets the strongest sun.
- Confirm which anchor points are truly structural.
- Decide whether you need breathable shade, waterproof coverage, or both.
- Measure the anchor-to-anchor span, not just the furniture area.
- Allow room for hardware and tensioning.
- Plan height variation for slope and drainage.
- Review wind exposure, soil conditions, and local frost depth.
- Contact 811 or your local utility-marking service before digging.
- Get professional input if the sail is large, high, exposed, or attached to the house.
- Use TheHues measurement support before placing the final order.
If you want another set of eyes on the layout, use the TheHues free design service before ordering. A quick layout review can be much easier than correcting one corner after the sail is already installed.
Shade sail or outdoor curtains: which works better for your space?
Shade sails and outdoor curtains both improve outdoor comfort, but they solve different problems.
| Choose this option | When it works best |
|---|---|
| Shade sail | You need overhead sun control, flexible coverage, and an open-air look |
| Outdoor curtains | You need side privacy, softer enclosure, or easier open-and-close coverage |
| Both together | You need overhead shade plus privacy or side glare control around a patio or pergola |
For many homes, the answer is not either-or. It is about deciding which problem you need to solve first.
FAQ about shade sail posts and footings
Can I use 4x4 posts for a shade sail?
Sometimes, for a small and sheltered setup. But a 4x4 post may not be enough for larger sails, taller posts, waterproof fabrics, or exposed yards. Confirm the post size based on your actual layout and local conditions.
How deep do shade sail posts need to be?
There is no universal depth that works for every project. Post depth depends on post height, sail size, soil, wind exposure, frost depth, and whether the sail is breathable or waterproof. Use general rules only as a starting point, then verify the final plan.
Do shade sail posts need concrete footings?
Permanent tensioned shade sail posts usually need a secure footing designed for lateral pull. Concrete is common, but the right footing depends on the post, soil, load, and local requirements.
Do waterproof shade sails need more slope?
Yes. Waterproof shade sails need a clearer runoff path because rainwater must leave the fabric surface instead of passing through it. Without enough slope, water can pool and add stress.
How much smaller should the sail be than the space?
Do not order the sail to match the full anchor span. The sail should leave room for hardware and final tensioning. The exact deduction depends on the product, hardware, and layout, so check the measurement guide before ordering.
Can I attach a shade sail to my house?
In some cases, yes, but the anchor must connect to a structural member, not just siding, trim, or decorative fascia. If you are unsure what is behind the surface, ask a qualified installer before drilling.
Final takeaway
Shade sail posts and footings decide more of the final result than many homeowners expect. The fabric gets the attention, but long-term performance usually depends on the anchors, post strength, footing stability, hardware room, and slope.
Start with the structure, then choose the sail that fits it. Measure carefully, verify anchor points, allow room for tensioning, plan drainage, and check local safety requirements before you dig.
When you are ready to move forward, use the shade sail measurement guide, compare materials in the TheHues sun shade sail collection, and use the free design service if you want help reviewing the layout before installation.